
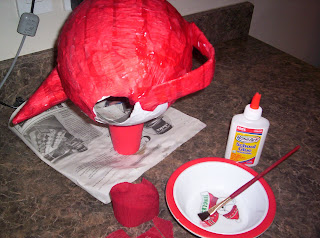
A teapot pinata, is one of the easier pinatas to make, and believe me with six children's parties a year, to plan for, I know. The pinata above is for a strawberry tea party birthday we have coming up. Since I was making it anyway, I thought I'd share the steps with you, too.
1. Start by covering a balloon in glue coated strips of newspaper. The glue should be watered down - about 2 parts water, one part glue. Keep the newspaper strips fairly small, usually about 6 inches long, and 1 to 2 inches wide. I like to place the balloon on a plastic cup while I'm working on it, with newspaper underneath, to catch the glue drips. Once the balloon is covered, except for a small spot at the top, so you'll be able to put candy in later, it will need to sit overnight to dry.
.JPG)
.JPG)
2. Place on a second coat of paper strips. If the pinata is for a large party, and will be holding a lot of candy, you might want to repeat this step two, or three times, adding extra strips around the top, where the strings for tying will be laced through.


...and then trim it...

...and tape it on. I usually use masking tape, but just about any tape you have handy will do.


4. Tape on the teapot handle - again, just a rolled up piece of paper.


6. Cover the pinata with a base color. I like to paint on a layer of watered down glue, with an old paintbrush, and then press on small squares of crepe paper, but I have used tissue paper, or even pretty napkins - I have never tried painting a pinata, but I know some people do. I usually cover half the pinata, let it dry, and then cover the other side.
7. Once the color coat is dry, fill the pinata with candy.

8. Punch, or poke two small holes on either side of the of the top hole, about an inch down, and lace a piece of sturdy ribbon, yarn, string, or twine through. You want it long enough for hanging the pinata, down to where the children can reach it with a stick. In this case, it's better to error in favor of length. You can always trim the string later if it's too long, but adding to the length would be very difficult.

9. Cover the hole, by gluing on a few more pieces of crepe paper.

10. Add the final decorations. In this case, to make it a strawberry teapot, I glued on construction paper "seeds", rolled up a length of crepe paper, to wrap around, and glue on the "lid", and glued on some tissue paper leaves, with a ball of tissue paper in the middle for the stem/handle.

And, the pinata is ready to hang. One thing to keep in mind while decorating a pinata, is not to worry about making it too beautiful, or perfect. It's really only meant as a candy container, and no matter how much the birthday child loves it, they'll happily bash it to pieces, in a matter of seconds.

It's great to be a homeschooler.


7 comments:
This is great! My five-year-old wants to have an Alice in Wonderland tea party for her 6th birthday and now we can make our own. Yay!
Oh my, did that ever turn out cute!
That is so cute and I have already planned on a tea party theme for a birthday this year. I hope to make this cake in pink.
http://www.coolest-birthday-cakes.com/cake-recipe.html#c11
That is so cute, I love it! And I'm so impressed with the number of parties you pull off, that's amazing. Thanks so much for sharing the steps, I'll be linking.
My daughter is having a mad hatters tea party this weekend for her 8th b'day and i am so happy i found this. Thanks so much for sharing, i better get on to it quickly
I've made these types of things at Easter to make decorative eggs but never thought about turning one into a teapot. Thanks so much. My daughter is having a Fancy Nancy 6th Birthday tea party and this will go quite well.
very helpful...now i can make my own pinata for my daughters 9th birthday as she wants an alice in wonderland party
Post a Comment