Okay, I promise this is the last candy corn themed project I'll post about this fall - Scouts honor! Of course, I never made it past Brownies in Girl Scouts, so I'm not really sure that means much.
Actually, I had planned on moving on today anyway, but Ticia from Adventures in Mommydom commented on how small the candy corn cookies we had for National Candy Corn Day were, guessing they took hours to make. In reality, they took less than an hour, and only that long because I made two different batches, while watching an old episode of Star Trek on Netflix.
The trick is to make them pretty much the same way as regular candy corn, by rolling out ropes of dough on a floured surface, pressing the colors together in candy corn order, and slicing them back and forth into triangles with a floured butter knife. The only difference is instead of candy corn dough, use sugar cookie dough (click here for the recipe).
I divided the dough in half for ours, and then into thirds, adding food coloring to two thirds of one half for a traditional candy corn look, and baker's cocoa to one third, with about a teaspoon of molasses with a pinch of ginger, nutmeg, cloves, and cinnamon to the another for chocolate gingerbread corn.
Scoop them up gently with a spatula onto a greased cookie sheet, and bake them for about 10 minutes at 350 degrees Fahrenheit, until they are just starting to brown.
They will be quite crunchy, much like Teddy Grahams - only candy corn shaped.
It's great to be a homeschooler.
Monday, October 31, 2011
Sunday, October 30, 2011
Fun And Games For National Candy Corn Day
Happy National Candy Corn Day!
Even now it's not too late to throw together a few fun ideas for the holiday.
We celebrated this afternoon with a pull-string candy corn pinata...
...filled with the candy corn finger puppets I posted about earlier, and little goodie bags with an assortment of store bought candy corn, at least as good an assortment as I could get my hands on, and some tiny, crunchy, candy corn cookies I made myself out of sugar cookie dough.
The goodie bags were just sealable sandwich bags I had on hand...
...folded in half, as shown, over the treats...
...twisted shut...
...tied tightly with pieces of yellow, orange and white yarn...
...and trimmed on top, to remove the "zipper" part.
The candy in the bags was for eating, but the rest of our supply of candy corn (what was left over, and the ones we've been using for math manipulatives all week) was set aside for games...
...like racing to see who could move the most candy corn from the table into a bowl in sixty seconds using a straw...
...or which team could be the first to blow a candy corn back and forth across the table ten times...
...or a relay game, where the children raced to fill small cups with candy corn, using a spoon to scoop up candy from bowls across the room, and taking turns with partners on their team. The first team to fill their cup was the winner.
Next on the docket is some homemade candy corn of course, and candy corn manicures for the girls.
I gave myself one this morning. You can find instructions for this type of nail art all over the Internet. It's pretty simple, just time consuming - a coat of white nail polish, a coat of yellow starting 3/4 of the way up the nail, a coat of orange just at the tip, a coat of glitter polish, and finally a clear coat protector, allowing each coat to dry completely before applying the next - probably not the wisest project to take on on a Sunday morning before church, but the girls in my Sunday school class thought it was pretty neat.
It's great to be a homeschooler.
Saturday, October 29, 2011
Turkey Time
I can't believe we're already at the end of October. I realized with a start this week, it's time to start working on hand print turkeys for our thankful turkey tree, to count down to Thanksgiving. The ones pictured below are last year's, this year's flock is still a work in progress. In fact, I have a feeling we'll but cutting, tracing, and gluing them for most of today.
In the meantime, feel free to take a look back at some of our other turkey themed crafts and snacks from last year and the year before. I was a little flabbergasted at the sheer number of them, starting off with a pattern for a Crochet Turkey Finger Puppet. You can also find the pattern for his pale pilgrim pal, here, and a pretty pilgrim partner for him (the pilgrim not the turkey) here. But today, we're all about turkeys...
... like these poor beakless Hand print Turkey Window Glue-Clings. They were one of our early attempts at window glue-clings. I was concentrating on the glue, and totally forgot the beaks. I'm pretty sure I went back and added them, as soon as the Man of the House pointed out their absence though, so it was all good.
Don't forget the Homemade Candy Corn Turkeys. You better believe they're on my to-do list for tomorrow. What better way to transition from National Candy Corn Day on into November, than with candy corn turkeys...
...or maybe Paper Candy Corn Turkeys to match...
...Pillsbury inspired Candy Corn Turkey Cookies?
For some non-candy corn themed fun how about a Circle Turkey Craft, or maybe...
... a few Turkey Bean Bags? This guy's still being tossed around the house, as are the finger puppets from above.
Needless to say, the Turkey Sandwiches didn't last quite as long. Though I have a feeling they might be making another appearance this fall along with their friends...
... the Rice Krispies Turkey...
...Turkey Bread, and possibly even...
... the Turkey Toast.
Looking at the national forecast, I'd have to say some of you are likely to see Snowflake Turkeys before us this year. You never can tell about the weather.
If you're starting to feel overwhelmed don't worry, you're not alone.
Linda White's delightful sequel to Too Many Pumpkins is not a Thanksgiving story, but rather the tale of how one rural resident deals with the problem of too many turkeys in a way that not only saves his wife's garden, but beautifies his entire community. We'll be reading it today, if the Lord is willing, to go along with our flock of thankful turkeys.
Find out what other families have been reading by clicking over to the What My Child is Reading link-up hosted by Mouse Grows Mouse Learns.
It's great to be a homeschooler.
Friday, October 28, 2011
Vocabulary Spelling City Review
I thought it was probably about time to share some thoughts about SpellingCity.com. Somewhere around three weeks ago I signed up for a free premium membership (normally $24.99/year for up to 5 students) in exchange for a review.
To be honest, I'm not sure where to begin. I like the website, but find it a little busy and disorientating, even with the "getting started" video clips. So, it's going to take me more than three weeks to really give a good evaluation.
A lot of SpellingCity.com is accessible for free already. You can check it out at any time, at the link above. There are games, printable worksheets, and tests for spelling lists. You can enter your own spelling lists, or take advantage of lists already on the website.
The premium paid membership adds an element of tracking and record keeping. Students are given their own log-in, and teachers can view their logs to see how often they've played games, or taken tests and which words need more work. There is also more of a vocabulary component to the paid membership, which is nice for older students. To the right is a checklist from the site, comparing the memberships.
My oldest (age 14) protested that it is a "baby site". I think that's mainly due to the slow but upbeat voice used to spell out the letters, and the cute animated mouse used in many of the games. He has however, been passing the tests. And G (age 12), the only one of my children who has been using a workbook for spelling help, says she likes the website's "play to learn" approach better than what she was doing before.
The games alone don't work for everyone. D (age 8) has been faithfully playing two games a day using the same spelling list, but has yet to learn how to spell the words. However, there are printable worksheets, and flashcards to bridge the gap.
All in all, I'd say it's a worthwhile website to check out, if you're looking for additional spelling resources for your children. Let them experiment with the free games and printables for a while, and then if they find them helpful, you might consider upgrading to a paid membership for the score keeping, and organizational benefits.
It's great to be a homeschooler.
Candy Corn Alphabet Memory
Keeping the candy corn theme going, I presented the girls (ages 5 and 6) with an alphabet matching challenge. It's a pretty standard game of memory. The only catch was I had to draw and color the candy corn myself, because our printer finally gave up working once and for all. Luckily I had the patterns from the candy corn finger puppets to use as a guide.
Once I had 52 candy corn colored and cut out, I printed the alphabet in lower and upper case, on the backsides of the pieces, for the girls to match up into pairs.
I let them play once with the entire set, and then pulled out the letters I thought C needed more work on, so they could play a few shorter, more focused games with just those letters. It wasn't much of a challenge for E, but she appreciated getting to be the "teacher" for her younger sister.
It's great to be a homeschooler.
Thursday, October 27, 2011
Candy Corn For Breakfast?
Wednesday, October 26, 2011
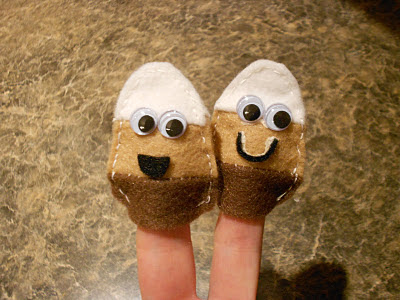
Candy Corn Felt Finger Puppets
Do me a favor, and pretend the candy corn finger puppets pictured above are wearing their traditional yellow, orange and whites. I'm afraid there is not a scrap of yellow or orange felt to be found in anywhere in town, including my craft cupboard. So, I'll be telling the children these are chocolate gingerbread candy corn, like we made the other day.
My local merchants have really let me down. Not only are they not selling orange or yellow felt, I couldn't find a single bag of candy corn colored M&M's, or candy corn Hershey Kisses, or even much variety beyond the plain old, plain old regular candy corn. It seems the stores have completely skipped over National Candy Corn Day in favor of some other holiday that falls on the 31st.
It's a real bummer for me, since the children have already seen the candy corn pinata, it's hard to miss hanging over our dining room table, and are waiting in great anticipation to find out what kind of candy corn themed goodies are inside. It's been a bit of a scramble, but I've come up with a few things, like the finger puppets.
They are pretty basic. If you want to make your own, start by cutting a small candy corn shape out of thin cardboard (like the back of a cereal box). You can use your index finger as a guide for size.
Cut the cardboard candy corn apart into its three pieces.
Then, trace around the pieces on another piece of cardboard, allowing 1/8 inch or so, for a seam allowance.
Cut out the bigger pieces, and use those to trace out as many pattern pieces as you want to make, on paper. You will need two of each piece for each puppet you want to make.
Cut the paper pieces out, secure them to your felt, hopefully you have orange and yellow.
Cut them out again.
Stitch the pieces back together into candy corn shapes.
Then, sew two candy corn shapes, wrong sides together, leaving the bottom side open.
Use a clear drying, tacky glue to secure on google eyes and felt scrap mouths...
...and they're ready to play. Well, you might want to let the glue dry first, but you know...
...that's optional.
It's great to be a homeschooler.
Subscribe to:
Posts (Atom)