Monday, January 31, 2011

Finger Knit (or Crochet) Hearts and Flowers - Hand Crafts for Children


We found this video demo for finger knit flowers, last week, through A Magical Childhood.


And, it's been just great, because I was having a terrible time teaching left handed, A (age 9), to crochet, and knit, and both crafts are too difficult yet, for the younger girls (ages 4 and 6). But, they can all finger knit, and crochet (what's in the video above, is probably what we would call finger crochet).

They've been having a terrific time crocheting out chains, and turning them into flowers.


Which we've hooked onto green pipe cleaners, with bits of white pipe cleaner...


...for pretty bouquets...


...and sewn onto single, finger crocheted, chains, for necklaces...


...and flower crowns.


We also found out we could turn the double crochet chains into hearts.

You have to begin with a chain that's about 6 feet long, then crochet it on itself, as for the flowers in the video above, leaving a long tail for sewing it up.


Lay it out flat, and fold both ends toward the middle (in the picture below, only one side is folded in), and sew them down.


Fold the ends in again, toward the middle (both sides are done in the picture below), and sew them down.


Stitch the loose end, on the needle, to the middle of one of the sides, and sew it through the middle of the other side...


...pulling the two sides together.


Then, stitch back and forth, through the sides, to the bottom, pulling the stitches tighter at the bottom, to make the point of the heart.


You can tie off, and weave your loose end in now, or run the needle with the loose end up through the top of one side of the heart...


...then through the other side, tying off...


...to make a necklace. I think it's a lot simpler, than I made it sound, so hopefully, I didn't confuse anyone, too much.


It's great to be a homeschooler.

Sunday, January 30, 2011

The Bike Tires Are Flat! Winter Science For Children

Science Sunday

We had a couple of warm, dry, spring-like days, last week. The children were thrilled to have a chance to pull out their bikes, in the middle of the winter. But, when the temperature dropped, so did the air in their tires.

They wanted to know why colder weather made the tires go flat. Thanks to Rose Wyler's Science Fun With A Homemade Chemistry Kit, I was ready with a Sunday Science experiment, to demonstrate the answer.

The air around us, and in our bike tires, or in a balloon, is a gas, made up of fast moving, spread out, molecules.

When the gas is cooled, like in a cold garage, or in the refrigerator, or even better - the freezer...


...the molecules slow down, and compress together. So, they take up less room, and the tires go flat, or the balloon shrinks. If you're very fast, after removing the balloon from the refrigerator, you can measure the difference (as long as you measured the balloon before you put it in the cold, for comparison).

But, what's really neat, is to put a balloon in the freezer, for an hour, and then pull it out, and hold it in warm hands. You can feel it expanding, as the air warms, and the molecules spread back out.


For more fun with science, check out this week's Sunday Science link-up, at Adventures in Mommydom.

It's great to be a homeschooler.

Don't Drink The Kool-Aid, Use It To Flavor Marshmallows, Instead


It's been almost exactly a year, since I experimented with marshmallow making. Apparently, the end of January is a good time for them, because I found myself pulling out the blender, and corn starch, yesterday, with heart shaped, Valentine, marshmallows in mind.

Last year, I tested an extremely easy, honey marshmallow recipe.


This year, I decided to try a more traditional approach, using corn syrup, sugar, and a candy thermometer. After a quick look through the online recipes, I settled on Alton Brown's (click here, to see it).

Inspired by some heart shaped, strawberry, Jet-Puffs at the store, I wanted to give my marshmallows a Valentine's twist. Unfortunately, I had used all my strawberry extract on the popcorn, the other day, so I needed to find a substitute to add to the sugary fluff - and thus, the Kool-Aid.

So, I dumped three packages of unflavored gelatin, and 1/2 cup of ice water into the blender (Mr. Brown's recipe calls for a stand mixer, but I don't have one, so I substituted, again).

Then, I brought a 1/2 cup of ice water, 1 and 1/2 cups of sugar, 1/4 teaspoon of salt, and 1 cup of corn syrup to a soft ball stage, on the thermometer, over medium heat.

The recipe called for adding the boiling, sugary syrup, slowly, while mixing it with the gelatin. The blender did not really allow for that option, so I added it all at once, and then blended the ingredients for 12 minutes.

I added 1 teaspoon of vanilla extract, and a small packet of unsweetened cherry Kool-Aid (minus a teaspoon worth, I removed to use later).

The mixture was suppose to become thick, and lukewarm, but in the blender, it remained in a liquid state, and was extremely hot.


I tried pouring it into a 9x13 inch pan, sprayed with cooking spray, and powdered with a mixture of corn starch, and powdered sugar, with a pinch of the extra Kool-Aid, but it spread out into an extremely thin layer, so I transferred it to a smaller container, also greased, and powdered.

I could tell it was not as air filled as it should be (I'm still blaming the blender), but it had the sticky-but-solid-and-won't-stick-to-the-pan quality of homemade marshmallows, so I continued.

I let it sit for an hour, uncovered. Then, I sprinkled it with more of the powdered sugar/corn starch mix, covered it with wax paper, and left it to sit overnight.

This afternoon, I removed it from the container. Again, even though it was sticky to the touch, it came right out of the pan, without any problems.


C, helped me cut heart shapes, and mini-marshmallows...


...and toss them in more powdered sugar, and corn starch.


They aren't quite marshmallows. They came out more as a cross between a marshmallow, and a gummy candy, but they are very good. D, gave them an A+, and T, said they are the best candies I've made yet.

Unlike, the honey marshmallows, I tried last year...


...they lack the light, air-filled, fluffiness, of good, hot-chocolate, marshmallows. In fact, they sink to the bottom of the cup like rocks, where they melt into puddles of cherry goo.

So, for a more traditional marshmallow, either use a stand mixer, or another recipe. But, for a yummy, marshmallow-like, Valentine's candy, the blender works just fine. And either way, unsweetened, cherry flavored, Kool-Aid is a good addition.


It's great to be a homeschooler.

Saturday, January 29, 2011

Groundhog Shape Craft - Triangles

Groundhog Weather School by Joan Holub, is the story of a groundhog weatherman who realizes, it is impossible for him to tell the weather, for the entire country, at once. To solve the problem, he opens a weather school, to teach other groundhogs the trade. Along the way, Holub, also teaches the reader a good deal about both groundhogs, and the weather.

The book was a little long for C (age 4), to make it through in one sitting, but she enjoyed the marmot filled illustrations, and wanted to make a groundhog craft, to go with it.

Since we've been on a geometry kick lately, I thought it would be fun to see if we could make a groundhog out of triangles.


We cheated a little, by cutting the corners off the triangles for the head...


...and ears...


...turning them into irregular pentagons...


...but C was pretty happy with the end result.


I like the way she glued the arms on, so they're touching the face, like he's scared. It looks like six more weeks of winter to me, but you'll probably want to check with your local groundhog, for the forecast in your area.

It's great to be a homeschooler.

Friday, January 28, 2011

Cereal Box Tessellations

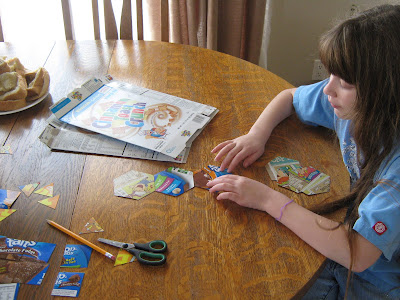
I wanted to clean out the rest of the empty cereal boxes, from under the sink today - the ones without any fun games on the back. I couldn't bring myself to just toss them out, but we don't have curbside recycling in our corner of Montana, and our local recycling center wants a donation if you drop anything off. So, I cut them up into squares, triangles, and hexagons, instead.

Then, I laid them out on the table, in a tessellating pattern, with a couple of extra boxes, a ruler, pencils, and scissors, in case anyone wanted to add shapes of their own.

Fridays are supposed to be completely unschooled, or our day off, as the children like to call it, so I didn't offer any kind of instruction, or activity with the shapes. Though, earlier in the week we had watched the Cyberchase episode entitled, "A Perfect Fit", dealing with tessellations (you can find it in three parts on YouTube, starting here), and I sat out a copy of D.B. Johnson's, Escher inspired, Palazzo Inverso.


I left the shapes on the table the entire day, through lunch, dinner, and snack time, as well. The younger girls were the first to take interest in them. C (age 4), used them to make pictures, like the girl with the bow on her head below.


E (age six), tried to piece the boxes back together, puzzle style.


A (age 9), made a path out of hexagons.


D (age 8), used triangles.


And, G (age 11), arranged a honeycomb.


T, who at 13, has lived with me long enough to recognize a learning activity when he sees one, wouldn't touch them. But, he was happy enough to call out the names of the different sided polygons, for anyone interested, and spent some time turning Johnson's book, this way, and that, studying the topsy-turvy illustrations.

None of them attempted a multi-shaped tessellation, but I returned the shapes to the same three shaped pattern, after each time the children left it. I like it that way, because it reminds me of my grandmother's quilts. She never finished school, and couldn't read, or write, but she knew how to tessellate - not that she would have called it that, anymore than she would have called cutting up the old shirts to make the quilts - recycling.

It's great to be a homeschooler.

Strawberry Popcorn - Accidental Science


Before we returned Rose Wyler's Science Fun With Peanuts and Popcorn to the library, I thought we should try out one of the recipes from the peanut and popcorn party section, at the back of the book.

We had noticed one suggestion for adding flavored extract, and food coloring to kernels of popcorn, that sounded interesting.

With Valentine's Day looming on the horizon, and with a limited number of flavor extracts to choose from in the cupboard, we decided to try strawberry popcorn.

We placed 1 cup of unpopped kernels into a Zip-loc bag, with a few drops of red food coloring, and two tablespoons of strawberry extract. We sealed it, and left it overnight, until all of the liquid was absorbed into the kernels - a science experiment in itself, by the way.


In fact, what I had done, was to mix up the recipe, which I had only glanced at, with one of the experiments earlier in the book. The recipe actually called for adding the flavored extract, and color, mixed with water, to already POPPED kernels. Oh, well.

We knew from previous experience, the color would only dye the outside of the kernels, but we were curious to see how the flavor would translate to the popped corn, so we continued.

As, you might expect, if you've ever done a soaked kernel experiment, we ended up with fewer popped, and smaller kernels, and they were tougher to chew. But, they did have a very nice hint of strawberry. It was somewhere between, eating a bowl of strawberry flavored children's cereal, and regular popcorn. It was enough flavor, that we could enjoy our popcorn without adding butter to it.

As a nice side effect, the extract seemed to set the color on the kernels, as well as making them smell wonderful. So, the younger girls had quite a bit of (supervised) fun playing with our left over kernels. They'd make a great addition to a sensory tub, keeping in mind they are a serious choking hazard for toddlers.


It's great to be a homeschooler.

Thursday, January 27, 2011

Supersized Tangrams


I did a quick search for more tangram activities, after we read Grandfather Tang's Story, A Tale Told With Tangrams by Ann Tompert, yesterday. I came across several, including a video on SchoolTube, of a third grade class using extra large tangrams, for a relay race (click the link to see the video).

I think, when we're back into spring weather, and I've had time to gather more cardboard, I'd like to make a couple of sets, for the children to race with, too. In the meantime, I decided to use an old, used up, piece of poster board, to make an indoor set, that can double as a template for cutting the heavier cardboard pieces, later.


The poster board started its life as packing material, but since the Man of the House brought it home from work, it has served as an indoor picnic spot, Lego battle ground, and dance floor. It's certainly seen better days, but I thought maybe, we could get one more project out of it.

My original thinking was, that we would recreate the shapes from Tompert's story. They are illustrated, with the lines drawn between the shapes, to make copying them easier.


But, we discovered, the larger size made putting together the silhouette shapes, we'd had some trouble with, from our cereal box, yesterday, much easier. None of us had been able to make this sand shark, with our smaller tangram pieces.


With the larger pieces, the shapes fell right into place. It's amazing the difference a change of perspective can make.


It's great to be a homeschooler.