Friday, January 29, 2016

Kung Fu Panda 3 - Cookies and Crochet


We joined friends today, going to see Kung Fu Panda 3, as a sort of impromptu birthday party for their daughter.  It was last minute, but there was just enough warning for me to attempt a quick crochet Po for the birthday girl.


I couldn't find a Po pattern, and so muddled through modifying a free crochet panda pattern from Angie's Art Studio.  The original pattern was a breeze to follow, by the way.  And, just so I don't forget myself - the modifications were: changing colors for the legs, and bottom of the body, to make pants, adding yellow stitches (sewn on) and then looping through red string for the belt, adding an extra round of stitching to the muzzle, and two extra stitches and an extra round to the belly (making 32 instead of 30 stitches in the middle), removing one round of stitches from the ears to make them smaller, and crocheting rounds similar to the ears for the eye patches, with white felt sewn on top.

All the changes made the pattern a little fussier than I would have liked, and the shortness of time meant I had to settle for how it turned out the first time through.  I wasn't completely happy with the results, though now that I look back at the original bear - this one does look more Po-ish.  My children liked him anyway, and the birthday girl held him on her lap to watch the movie, so I guess that makes him a success.

Personally, I had a lot more fun trying to piece together Oreo cookie and M&M pandas for a post movie snack.  They didn't turn out looking anything like Po either...


...but I think he would have appreciated the attempt to craft (and eat) to our potential.

 "If you only do what you can do, you'll never be more that you are now." (Shifu, Kung Fu Panda 3)

Monday, January 25, 2016

Q-bitz Inspired Cookies - Game Night Snacks


We hosted a game night for a group of our friends, on the weekend.  As I was planning out a few snacks and goodies for people to munch on, I decided it might be fun to bake up a batch of puzzle themed sugar cookies (it's been a while since I've had a sugar cookie project to work on).


Drawing inspiration from our Q-bitz game, I mixed one batch of sugar cookie dough, making half vanilla and half chocolate (recipe here), and cut a quick 4''x4'' square of paper...


...and then wax paper, to use as a template...


...for cutting six chocolate and six vanilla squares...


...marked off and...


...cut into one inch squares...


...which could be quickly cut diagonally...


...or punched out in the center with a frosting tip, to mix and match the colors according to the patterns on the sides of the Q-bitz cubes (making enough flat sides to make the patterns for two sets worth of cubes)


I let them bake together, and then cut them apart while they were still hot out of the oven.


Then, once they had cooled completely, I placed like sides into containers on the counter, along with the pattern cards from the game, and one completed "puzzle" as an example.


The only thing I wish I had thought to add, was a short written instruction, so people circulating through the kitchen could have easily understood the purpose of the cookies.  Not everyone is as use to playing with their food as we are.  However, I had a great time putting puzzles together, and munching on the left-overs the next day.

Tuesday, January 19, 2016

Sunday School Snack - Mark 2:1-12, Four Friends Carry a Paralyzed Man to Jesus.


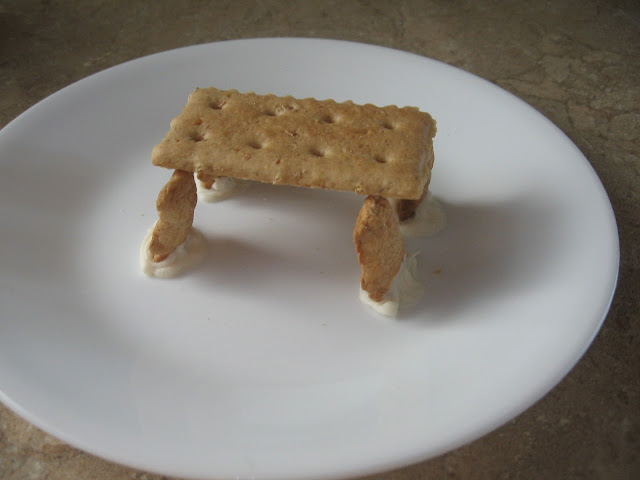
Pipe four blops of frosting onto each plate (practice ahead with using the corners of a graham cracker to measure off the placement of the frosting).  Let children stand four Teddy Grahams in the frosting, for the four friends.


Balance a graham cracker "mat" across the top of the Teddy Grahams.


Give the children one more Teddy Graham each, to carefully place on the mats, as the paralyzed man.


A few days later, when Jesus again entered Capernaum, the people heard that he had come home.  They gathered in such large numbers that there was no room left, not even outside the door, and he preached the word to them.  Some men came, bringing to him a paralyzed man, carried by four of them.  Since they could not get him to Jesus because of the crowd, they made an opening in the roof above Jesus by digging through it and then lowered the mat the man was lying on. When Jesus saw their faith, he said to the paralyzed man, “Son, your sins are forgiven.”
Now some teachers of the law were sitting there, thinking to themselves,  “Why does this fellow talk like that? He’s blaspheming! Who can forgive sins but God alone?”
 Immediately Jesus knew in his spirit that this was what they were thinking in their hearts, and he said to them, “Why are you thinking these things?  Which is easier: to say to this paralyzed man, ‘Your sins are forgiven,’ or to say, ‘Get up, take your mat and walk’?  But I want you to know that the Son of Man has authority on earth to forgive sins.” So he said to the man,  “I tell you, get up, take your mat and go home.”  He got up, took his mat and walked out in full view of them all. This amazed everyone and they praised God, saying, “We have never seen anything like this!” (NIV) emphasis added for the snack.

Sunday, January 10, 2016

John the Baptist - Preschool Sunday School


As our lesson today was on John the Baptist, we started out with a quick, clothespin  grasshopper/locust craft, during the busy-time, as the children arrived.  There are several different versions of this craft in Google images alone.  In fact, Ticia over at Adventures in Mommydom made one using a plastic spoon, instead of a clothespin, for her own lesson on John the Baptist.


I thought I'd share our method, since it worked nicely with the 4-5 yr old crowd.  I gave the children clothespins (which they colored green with markers, on top of paper towels), pre-cut pipe cleaners for legs and antennae, and let them choose from a selection of different sized googly eyes.

After they had finished coloring their clothespins, I placed a piece of clear tape, sticky side up on the table, and helped them press the leg sticks across the tape...


...and then the clothespin on top of that.  I snipped and folded the tape around onto the sides of the clothespins, and showed the children how they could gently bend the legs to make feet, so the bugs would stand.


Then, they slipped the shorter antennae pieces through the hole in their clothespins...


...and I twisted the ends together around the top for them, and added dots of glue for the eyes.


I reminded the children about the story of Mary going to see Elizabeth, that we had studied during the Christmas season, and asked them if they remembered the name of Elizabeth's baby (which happily, they did).

We watched a quick clip about John the Baptist from What's in the Bible volume 10.


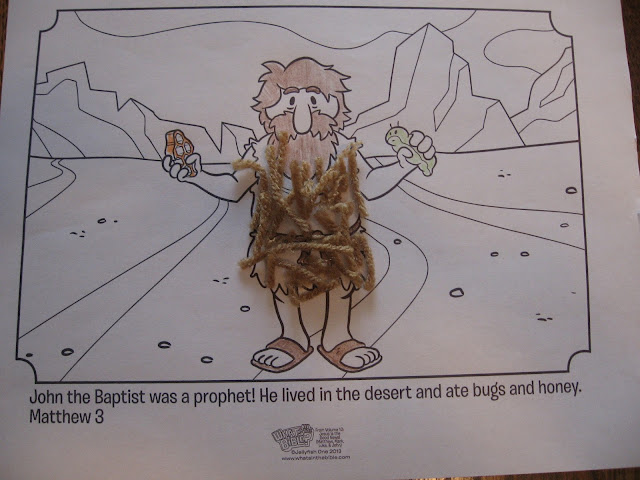
And then, I gave the children coloring sheets printed from the What's in the Bible website, for them to glue camel's hair (brown yarn) to his outfit (an idea from Dannielle's Place)


I found an idea from the Watermark Church website for making paper chains with the children, by asking them who had told them about Jesus, and then adding a strip for each person that had either told them about Jesus, or who they could tell about Jesus.

I used this idea to go along with our verse snippet - "John told others about Jesus. Luke 3:18" by writing the words onto strips ahead of time, then as we made our chains, we were reminded that John told others about Jesus, and so can we we.


Finally, we ended our lesson by talking about John baptizing people, after they turned away from their sins - preparing them to meet Jesus, and how he ultimately baptized Jesus too, initiating the active portion of His ministry, illustrated by a blue frosted graham cracker and teddy graham snack, which they loved putting together (though now I can't find where that one came from).


A word of caution to the wise:  when giving children, dressed in church clothes, blue frosting to slathering onto graham crackers, painting smocks might not be a bad idea.

Friday, January 8, 2016

Engineering for Children, Part 2 - Compression, Tension, and Friction?


Last winter we experimented with cardboard tubes in an effort to better understand the forces of compression and tension in construction.  We found that by simply draping a length of toilet paper, from a fresh roll, across the tops of the bottom layer of a cardboard tube pyramid, we could build the pyramid much higher than if we built it with nothing between the tubes. 

We attributed this to tension provided by the paper (much like a girder in a building) providing horizontal force to counteract the downward force of the compression from the tubes.

This morning, we received a comment suggesting that friction between the paper and the tubes was also at play.  I mentioned that to the children at breakfast, and they agreed we needed to experiment further - this time with friction and tension in mind.

First we rebuilt a tower, just high enough to get it to collapse.


Then, tried again on the carpeting, thinking that the carpet would provide more friction than the table, right off the bat, and might be enough to hold the pyramid in place.  But, the pyramid collapsed just as it had on the table.


I asked the children if there might be a way to reduce the friction between our "girder" and the tubes, so we could see if the tension still held.  They suggested draping a strip of slippery, wax paper across the tubes, in place of the toilet paper.


It worked perfectly.  There was a completely different feel to the tower as it rose.  The wax paper held everything sturdily in place just as the toilet paper had in our previous experiments.

Not quite ready to give up on the friction concept though, we wrapped the bottom tubes in toilet paper, and tried rebuilding the pyramid.


It collapsed just as when built with unwrapped tubes.  A(age14) was able to get it to stand briefly, by adding side supports (upright tubes) and stacking the tubes very gently.


Her tower even continued to stand for a few seconds after she removed the side supports.  But then, gradually, the gaps between the tubes widened until the whole thing collapsed.


The tower with the wax paper continued to stand until we finally dismantled it to clean up for lunch, leaving us with similar conclusions to last year - the compression force of the tubes pushing down either side of each tube in the bottom layer, creates a counteracting, horizontal pull on the paper, that keeps the next layer of tubes from pushing on down into the gaps between the bottom tubes.


What do think?  Are we missing something?

Thursday, January 7, 2016

Anyone Can Cook - A Cooking Class in a Book


Several mid-year moves in high school, coupled with a few rigid and unimaginative school administrators, led to my taking a higher than normal number of home economics classes through my teen years - standard home-ec, creative cooking, sewing, interior design, and such.

And while they wouldn't have all been my classes of choice, they were informative and, as it turns out, practical for my current lifestyle.  All the same, for the first few years of my married life, when it came to applying classroom knowledge to daily lunches and dinners, I found the Better Homes and Gardens cookbook, I received from some knowing aunt as a wedding gift, invaluable.   It seemed very natural then, when my teens asked to add a home-ec element into their schedules, to turn back to Better Homes and Gardens.

I was very happy to find to find just what I was looking for too, in Better Homes and Gardens: Anyone Can Cook...


...not to be mistaken for the fictional cookbook from Disney's Ratatouille.


The Better Homes and Garden title is more than just a cookbook.  It's more like a cooking class in a book. There are plenty of helpful hints, and "ask Mom" type instructions at the bottom of each page, with advice on everything from "how do I measure butter?" to "how do I cut a pineapple".  The accompanying video has additional classroom type lessons on things such as the difference between liquid and dry measures, and which knife to use when.  And, as a bonus, the cookbook comes with a free, one-year subscription to the Better Homes and Garden magazine.

The recipes are rated by difficulty, and progress nicely from easy to difficult.  My oldest girls (who have decided to prepare Monday dinners for the family) had no trouble finding a recipe they wanted to try out - "mashed potato chowder" - the results of which, you can see at the top of the page.

Other than all the teaching portions of the book, the recipes are the what you'd expect from a basic cookbook.  There's a nice variety, but nothing too exotic - no ratatouille, for instance.  For that, you'd need the Disney approved cookbook for the movie (strangely enough, not titled Anyone Can Cook) which we haven't tried, but which I did notice has gotten very good reviews on Amazon.


Anyway, my teens were just as happy to choose a recipe from a cookbook without rats on the cover, though I think my younger girls might get a kick out of movie-go-along.  However, the Better Homes and Gardens' cookbook is straightforward enough for the younger children too (mine are 9 and 10), and in fact I will probably use it with them, as well.

I would have had all the children cooking together to save teaching time, but you know the old saying about too many cooks...


...which strangely enough is the title of one of the Ratatouille picture books.


I, however, have my eyes on another Better Homes and Garden title, that I think has the potential to become a family favorite.


Tuesday, January 5, 2016

Norse Mythology with a side of Falafel


I picked up a bunch of falafel filled sandwiches from our local pita place, so the kids could have a taste of Magnus Chase's favorite food.  You can check out this Good Eats chickpea episode if you aren't familiar with falafel.  We watched it while eating our pitas.  It's quite educational.


Rick Riordan's latest hero loves falafel.  My bunch...


 ...let's just say they're not all fans of Middle Eastern flavor (and don't even ask about the hat).  The book though, has been a pretty big hit with those of us, T (age 18) - avoiding his college textbooks, D (age 12), A (age14) and yours truly, who are reading it.  The children are all fans of the Percy Jackson series, but haven't cared much for Riordan's Egyptian sagas.  This book, set in the 9 worlds of Norse mythology, has recaptured their interest. 

In fact, they're enjoying the story enough, that I might have to re-read an old high school favorite of mine (just to make sure it isn't too colorful for their sensibilities - I was a lot more liberal in my youthful reading selections than they usually care to be).


If I remember right, pizza was the food of choice for Adam's Norse god encountering characters - pizza and something about clean, white, linen sheets.

We all like pizza (even my youngest), and clean sheets, and now have a new interest in Norse mythology.  Plus, the next book in Riordan's new series doesn't come out until October.  We're going to need something to read in the meantime.

Sunday, January 3, 2016

The Eiffel Tower String Trick - Step by Step


I decided it would be fun to teach the younger girls how to do the Eiffel Tower string trick as a follow-up to our New Year's Eve pretzel tower (which I should say was as much fun to demolish and eat as it was to build).

Of course, before I could teach the girls how to make the tower out of string, I had to learn the trick myself.   Thankfully we're still on Christmas break, because it took me pretty well an entire day to successfully master the steps. 

I started out watching a YouTube video from WhyKnot.  Then, realizing the tower was really just Jacob's Ladder turned and pinched together, I switched over to YouTube instructions for Jacob's Ladder from MomsMinivan (love those names!). Still a little confused on a couple of the steps, I decided to search out some still pictures, the best of which I found in a string trick book on Slide and Share, except that with my hands wrapped in string, I kept advancing the page too far, and sliding right out of the directions I wanted.

Between the three, I did eventually master the figure elementary school children have been creating with ease on playgrounds around the country for years.  There's nothing like attempting a child's game for promoting humility.  Anyway, after all of that, I thought I'd add one more set of pictures and instructions to the mix, for all the visual learners like me.

The Eiffel Tower:

Start by draping a loop (made of string long enough to wrap two and a half times from your hand to your elbow) a across your palms as shown.


With the index finger of one hand, go under and hook the string running across the opposite palm with hands palm facing palm...


...and pull it back...


...then repeat the step with opposite hands...


...to form what is called an "open A".


Drop the string off of your thumbs...


Then take your thumbs...


Reach under all the strings, hook the last string and pull it back on your thumbs...


Then, reach over the nearest string on the pointer finger with your thumbs and under the farthest string on the pointer fingers...


...and pull that back too, giving you two strings looped on each thumb.


Next, drop the loops off of your pinkie fingers.


Use your pinkies to reach over the string nearest them, and under and into the loop around the thumb...


...and stretch your pinkies out with the string.


Drop the string off of your thumbs.  This makes the "Cat's Whiskers" by the way.


 Reach over the string wrapped around your pointer fingers with your thumbs, and under and into the loops on your pinkies...


...and pull your thumbs back with the string.


Being careful not to lose the loops on your fingers, use one hand to take the loop from the opposite pointer finger..


...and stretch it over the thumb of that same hand.


Then take the original loop (now on the bottom) from the thumb...


...and lift it over the loop shared with the pointer finger, and off the thumb.


Repeat the steps on the other hand...


This will create a triangle in front of each thumb. 


***The next steps are tricky, and need to be done in one fluid motion***

Bend your index fingers down into the triangles...


...drop the string off your pinkies...


...and turn your palms away from you.  Now you have Jacob's ladder.


Keeping your hands close enough together to keep the string loose (this is important), rotate the figure, and pinch your top pointer finger and thumb together to make a tower.


And, if you happened to be using glow-in-the-dark yarn, turn the lights off, for an illuminated, night time in Paris effect.


Bon courage!