Showing posts with label Snack Time. Show all posts

Tuesday, August 2, 2016

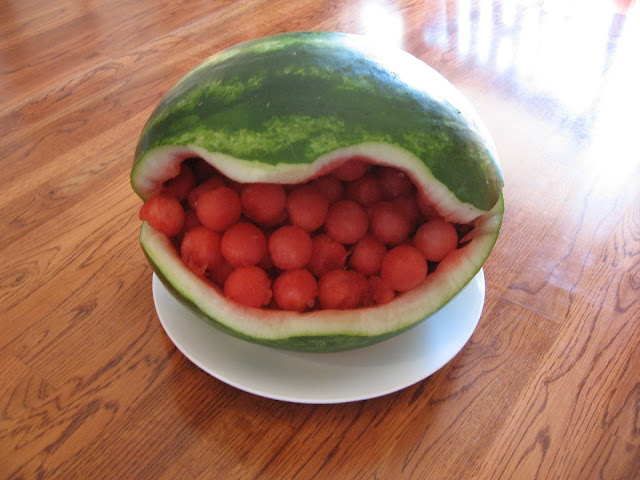
Tips for Carving a Watermelon to Look Like a Clam: Step-by-Step


I saw a couple of shots of watermelon carved to look like clams, when I was researching ideas for our ocean themed VBS lunch, and thought they'd be perfect.  Unfortunately, when I followed the links from the pictures back to their sites, there weren't any instructions for the carving.  Still, I thought, how hard can it be?

Let's just say, I'm fortunate another family in our church offered to carve two of our four watermelon, and did theirs first - in time to share their tips with me, and stop me from going about the process all wrong.

Since, they don't blog, and you might someday want to carve your own watermelon clams (never say never), I'll pass along their tips, and a few from my own carving experience.  Just keep in mind, that watermelon carving is not big on my list of talents.


So, first off, you want to slice a thin piece off of the bottom of what will be your clam, so the watermelon doesn't roll around while you're carving - or on the serving table.

I cut a little deep (as you can see below), which was not ideal, as it let juice leak out later, but not so much that it was a big problem.


Next, figure out where you want the opening of the "mouth" to be, and cut out a wedge of watermelon.  In the picture below, it looks like I cut the wedge low - but for some reason the watermelon was rocked forward when I took the picture.  The opening should be a little above center.


Mark off a scallopy short of shape, to carve out - matching the ups to downs on the the bottom half, and vice-versa, to give the appearance it could close back together.

If you use washable marker, keep in mind, the watermelon juice will wash it away, pretty quickly.

I tried to carve the design before removing the watermelon, but found it was much easier after the shell was emptied out...


...which was done with a melon baller, followed by a scraping with a large spoon.


When you do carve, tilt the knife inward, to allow an outline of white to show around the opening (a straight cut ends up looking much less clam-like).


Finally, place the melon balls back into the watermelon shell, and serve (or cover with plastic wrap, and store in the refrigerator until your ready to serve - though then you might want to store the melon balls in a separate container, to keep the juice to a minimum inside the shell).


Oh, and one final tip:  We transported our watermelon to church on plates (as pictured), our friends had theirs in shallow baking dishes.  We arrived covered in watermelon juice.  They did not.  So, there you go.

Monday, August 1, 2016

VBS Snacks - Submerged


Our week, last week, was consumed with Vacation Bible School.  Our church hosted, using LifeWay's "Submerged - Diving Deep Into the Word of God" curriculum.  And, instead of teaching this year, I decided to mix things up a little, and signed on as the snack lady, instead.

Which meant my kitchen spent the week looking like this...


...or this...


...and I spent the week dressed in a gaudy swimsuit cover up and snorkel mask (as pictured at the top of this post), with fun foam flippers on my feet (find instructions for the pattern at Dazzle Design). 

Because, it's just not VBS if someone isn't over the top.


Anyway, the triple batch of squidamon rolls (thankfully made with the use of two bread-makers) were a mid-week treat for my fellow laborers...


...while the children received a daily Bible story themed snack as follows:

Rice Krispie and Kit-Kat trees with Sour Patch Kids for the story of Zacchaeus from Luke 19 (snack idea from 52 Ways to Cook).  For a dairy and gluten free option, I used Smart Balance dairy free butter, and made a color free batch off Rice Krispie bars to cut up as "trunks" in place of the Kit-Kat bars.


Cups tied with brown yarn, and labeled with a verse of the story from John 4...


...filled part way with blue raspberry Jolly Rancher Jell-O for the story of the Woman at the Well. 

We built a "well" out of large cardboard bricks (from the nursery) on the table, and lifted our cups of "special water" out of it, to serve to the children.


For the story of Nicodemus from John 3, I went back to our old, chocolate and vanilla sugar cookie recipe (found here)...


...to make use of the Southern Baptist's ABCs of Salvation (Admit, Believe, Confess - click here for a free printable explanation, with go-along verses).


For our non-gluten and dairy free option, I made homemade gummy candies (using the recipe from Not So Idle Hands, and Jolly Rancher Jell-O in various flavors), cut into ABS with a cookie cutter, after they were set.


For the story of Jesus restoring sight to a blind man from John 9, I went very simple with "mud" pudding cups, topped with crushed chocolate sandwich cookies, and gummy worms. For a non-gluten option, I left the cookies (though you can purchase gluten free sandwich cookies) and gummy worms off.  We also made a special batch of Hershey's chocolate pudding, using chocolate almond milk, for a lactose free alternative.


With the exception of milk (chocolate, plain, and chocolate almond) served with the cookies, we served water with the snacks for most of the week, since the snacks were already sugary, and we had very hot weather.

But, to keep it fun, I made dolphin ice cubes to add to the cups (using silicone trays, found in a dollar bin at our local K-mart).  Each child got one plain dolphin ice cube, or a Kool-Aid dolphin (if they drank the water quickly, they could eat the dolphin like a little popsicle piece - or they could drink slowly and let it melt into their water as they drank it) in their cup.


On our last day, we had a short program for the parents, followed by a mini-dinner.  We made a few hundred dolphin ice cubes to go with Blue Hawaiian Punch, cut four watermelon into clam shapes (I cut two, and ask another family to cut two (ours were not as pretty as the other family's but I did come out of it with some tips, I hope to share in another post).


We made crescent roll sandwich crabs (which I totally missed taking a picture of, but you can find examples of on Pinterest, or here, in Google images) with green olive eyes on pretzel sticks.

And, a platter of hot dog wiener octopi (instructions here).


We cut bell pepper octopi to top store bought dips on vegetable trays...


...and used up left over rice Krispie treats, by cutting them into ABCs or squares decorated with blue frosting, fish crackers and sprinkles (following instructions from The First Year blog), which we placed out on a tray labeled with our Nicodemus story card, and a explanation of the ABCs of salvation)


We also filled a couple of large bowls with Cheetos (for corral), and fish crackers mixed with blue and green M&Ms, using the rest of the colors from the bag in several batches of cookies (which we labeled as "diving for pearl" cookies, to go along with a theme of one of the games the children had played during the week where they sought out colored marbles - which they called pearls).


Add to that a couple of bowls of chocolate pudding (regular and lactose free) with a separate bowl of crushed cookie topping, labeled with our Jesus and the blind man story card, and a bowl with our left over Sour Patch Kids, labeled "Wee Little Men" along with our Zacchaeus story card, and it wasn't too bad a spread.

Set atop blue plastic table cloths on a couple of long tables, it looked in keeping with the Submerged theme, and provided enough memory prompts to encourage children to share stories of the week with their parents - which I was very happy to over-hear a number of children doing enthusiastically.

Wednesday, November 18, 2015

Gingerbread Turkeys


I had such good intentions of filling November with turkey themed thankfulness for my youngest two, but a family funeral (more on that later) called me out of town for a couple of weeks.

I returned home just in time for the first real snow of the year, and hit the ground running with gingerbread men (no story reference intended).  It's our tradition to celebrate the first, big, sticking snow of the season by decorating a batch of gingerbread men together, and I was truly thankful to be home in time to take part in the tradition.

While the cookie boys and girls were baking in the oven, I decided to try and recoup a little of November too, and get things back on the turkey track by cutting the left-over dough into gingerbread turkeys - or rather, gingerbread flowers (we don't actually have a turkey cookie cutter)...


...which could be trimmed...


...baked...


...and frosted...


...into gingerbread turkeys...


...all ready to be enjoyed with steaming cups of hot chocolate on a snowy, November afternoon.

Tuesday, October 27, 2015

Pumpkin Gingerbread S'mores


On a rainy, autumn afternoon, with the help of a cozy fire...


...gingersnaps, pumpkin marshmallows, and a few mini chocolate bars...


...combined together into fall perfection.


Okay, to be honest, the pumpkin marshmallows were a little strange, and maybe too spicy to go with the gingersnaps, but the children liked them, and the s'mores smelled like Thanksgiving and Christmas combined - so near perfection, anyway.

Friday, September 4, 2015

Edible Pine Cone Owl Snacktivity


The girls came in from playing in the rain last night, bedraggled but invigorated, and ready for a snack.


I decided it would be good time to try making edible pine cone owls.  We've made plane old pine cone owls before, of course, but now that the girls (ages 9 and 10) are getting older, they are ready for greater challenges.

First I showed them how to make edible pine cones following instructions from Handmade Charlotte, using pretzel sticks, Chocolate Toast Crunch cereal (our substitution for the Chocolate Fiber One cereal from the original recipe), and Nutella and peanut butter dough (click the link for the recipe and instructions).


Once we had our pine cones constructed, we let them firm up a little in the fridge (the dough gets soft when handled), while we prepared our owl making supplies - using...


...mini Oreo and Reese's Pieces for eyes...


...chocolate Tootsie Rolls squished and trimmed, with kitchen scissors, for wings...


...and orange and lemon Tootsie Rolls, also flattened and trimmed, for the beak and feet.


All of which...


...we carefully stuck to our pine cones...


...with small blobs of the left over dough.


Naturally, by the time the girls had finished crafting their owls, and a few extra pine cones (they are so much fun to make), they (along with their older sibs) had consumed enough pretzels, cereal, candy, and dough, that we decided to save their snacks for later.


We have a stormy weekend forecast, so there should be plenty of opportunity for working up appetites, and burning off all that sugar, while playing in the rain.

Monday, April 13, 2015

Pollination Snacktivity


While we were out looking at ground squirrel holes, and ladybugs, C (age 8) also spotted an Apis mellifera on our Taraxacum officinale.  Although, I believe she might have called it a honeybee on the dandelions.  Or, maybe she was just screaming - BEE!!!!!


Anyway, she might not have been to happy to see the bee in its natural habitat, but all three younger children (ages 8-12) were pretty interested in the pictures of said bee collecting pollen on its corbicula, or pollen sacs (you can see the orange balls of pollen sticking out from the bee's back legs, in the picture above).

The pollen sacs, also sometimes called pollen baskets, are polished indentions, surrounded by hairs, in the bees' tibia, used to collect pollen for transport back to the hive.

We tried out our own "pollen" collection techniques with a Bee-licious, Scholastic, Bee Movie inspired snacktivity.


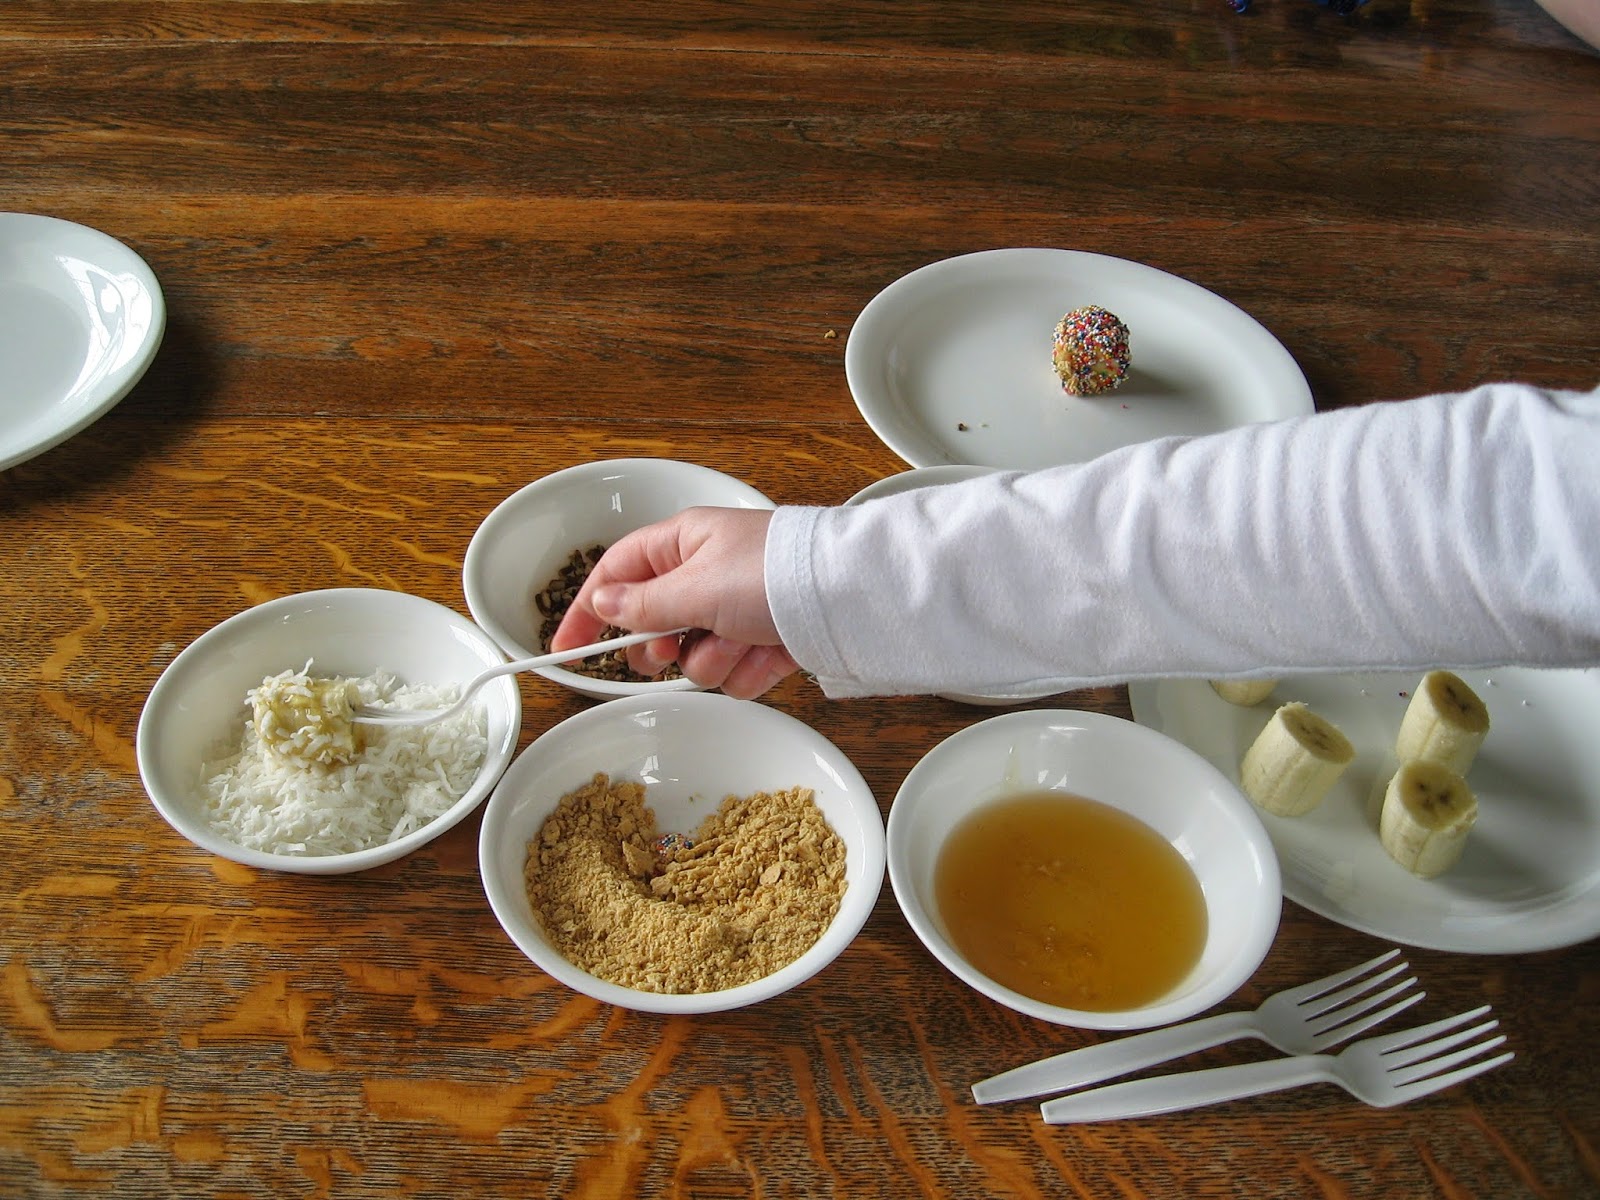
With plastic fork "bee legs", and banana "pollen baskets"...


...made sticky with honey instead of hairs...


...we collected "pollen" (candy sprinkles, nuts, coconut, and graham cracker crumbs) from one or two of our bowls (standing in for flowers).


After we had made (and eaten) a few of our bee-nana snacks, we began to notice, that we weren't just collecting "pollen", we were depositing it, as well...


...providing us a perfect segue from the activity of bees to the process of pollination.

It's great to be a homeschooler.