 The idea for these little guys came about accidentally. We were originally trying to create a sort of pom-pom bear, which ended up looking more like a dog, but not quite a dog either.
The children are calling them Yarn Yetis, and they're all the rage in our house right now. Everyone has to have one, except for T, of course. As a 14 year old boy, he's immune to the cuteness of the yarn creatures.
The best part of the Yarn Yetis, other than their obvious adorableness, is that they are quick and easy to make. It's a slightly more difficult fork weaving project than the flowers, or spiders we've made before - probably best for upper elementary aged children. But, younger children accustomed to fork weaving, might be up to the challenge with just a little bit of help.
To make a Yarn Yeti of your own, you will need yarn (only one color, but for the purpose of clarity, we used two in the pictures below), one regular fork (the longer the tines, the better), one baby fork (we used a 4 tined baby fork), scissors, a yarn needle, tacky or hot glue, and a pair of google eyes for each creature you plan to make.

You begin just like for the other fork weaving projects, by cutting a piece of string, and centering it between the middle tines of a dinner fork, only this time the piece of string should be about two and a half feet long.

Then, place the loose end of the skein of yarn next to the far tine, and holding it in place, weave the yarn back and forth through the tines...


...until you near the top of the tines. Cut the yarn loose...

...and tie the original piece of yarn around the weaving, through the center tines (you can hold the fork between your knees, if you don't have a friend to work with).

Carefully remove the yarn from the fork, and...

...pull the knot tight. Secure with a second knot.

Fluff out the loops of yarn, and trim the short loose ends. Leave the two long ends (shown in black above and below) alone.

Repeat the steps to make a second pom-pom, but this time, begin by cutting two lengths of string, one two and a half feet long, and one slightly shorter.

Use the second piece to drape across the top of the fork before you tie the first string around the weaving, then proceed as you did for the first pom-pom.

This will give you two pom-poms, one - the head, with two long loose ends, and the other - the body, with four long loose ends.

Now, your ready for the baby fork. Cut a short piece of yarn, and center it between the middle tines of the smaller fork...

...then thread one of the loose ends of the pom-poms through the outer space between the tines, and pull the loose end, so the back of the fork is tight against the pom-pom.

Weave the loose end back and forth through the tines, until you reach the top of the fork, or run out of yarn.

Tie it off, with the centered piece as usual, to create a small pom-pom attached to the larger pom-pom in the same way you made the larger one.


Repeat the steps for all six loose ends, until you have two pom-poms - the head, with two small pom-poms for ears, and the body - with four small leg pom-poms attached.

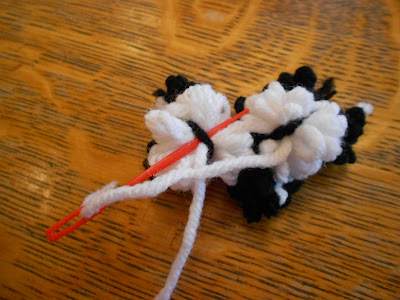
To connect the two pom-poms, push the loops apart at the bottom of the head, and the front of the body, to reveal the strings tied around their centers. Then, cut a short piece of yarn from the skein, and use the yarn needle to thread one end through the center body string, and the center head string.

Then, thread the other side of the string under the center string of the head, in the opposite direction from the first end.

Tie the two ends into a tight knot, to pull the head up onto the body, and secure with a second knot.

Trim the ends.

Pull a loop up from the back of the body, to make a sort of tail...

...glue google eyes on the face...

...and your creature is ready to join the herd. Ours have all turned out similar, but slightly different, just like the children who own them.

It's great to be a homeschooler.

8 comments:
Too cute! And I love your last line.
I LOVE THOSE! Thanks for sharing! We're going to do the spiders later this week, but I may have to throw some of those yetis in. Thanks for helping out an unexperienced homeschooling mommy! :D
Adorable!
Those are adorable! I am bookmarking this, though I'm usually a bit craft phobic. ;-) Thanks for the clear instructions!
GREAT tutorial. My son will want to do this as soon as he gets up!
They look way too cute! Can they be pulled apart? It seems like they would be.
So far ours have held, but I'm sure eventually they coul be pulled on enough to leave you with a hanful of yarn.
only one word awwwwwwwwwwwwsuuuuuuuuuuuummmmm work..
Post a Comment