 Ready for a little more fork weaving fun? How about making a spider?
It's pretty much the same as weaving a flower, but with the addition of a couple of extra, cut pieces of yarn, about 4-6 inches long, and some googly eyes.
Start, as usual, by centering one of the cut pieces of yarn between the center tines of a tall dinner fork (the ends will serve as two of the legs).

Drape the loose end of a ball of yarn ball through the far right tines of the fork, so about two inches worth of yarn is hanging down (this will be the third spider leg). Holding onto the loose ends, so they don't slip...
 ...begin weaving the yarn in and out of the tines of the fork, pushing it down to keep it tight, as you go.
Continue weaving...

...until the yarn almost reaches the top of the tines. Cut the end loose from the ball, leaving a tail, at least two inches long (this will be the fourth leg of the spider).

Weave, or loosely drape, the two remaining, cut pieces of yarn, across the top of the fork, with a couple of inches hanging down on each side (these will form the final four legs). Keep track of the original piece of yarn, placed between the center tines.

Holding the fork between your knees, to free your hands, grab hold of the loose ends of that original piece of yarn...

And, tie it around all the yarn, between the center tines.

Gently scoot the yarn off of the fork, keeping track of the loose ends of the original piece of yarn.

Pull the knot tighter, and secure it with a second knot.

Spread the loose ends out, four on each side, and fluff the center into a pom pom.

Trim the loose ends to the same length.

It should be looking pretty spider-like already.

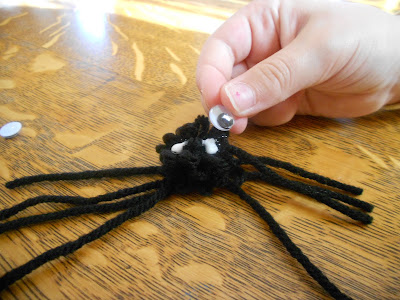
All that's left is to glue on a couple of google eyes.


You could use hot glue for extra security, but we found tacky craft glue to be sufficient to hold the eyes on, even after hours of play. Little Miss Muffet has nothing up on the Polly Pockets in our house.

It's great to be a homeschooler.


7 comments:
They would be a fun as a craft for a Halloween party!
I am impressed with what E (I think it's E?) could do - her spider looks great!
Raising a Happy Child - Yes, it's E - and thanks. She's pretty crafty, but the spiders aren't as tricky as they look :)
She looks so proud of herself, and for good reason. I need to show this to my boys, who are spider crazy right now (much to their Aunt's dismay).
That's so fun! Thanks for the great project, I'll be linking.
I love the picture of E biting her nails...ummm let's see if I can figure this out? What a cute spider she made!
Just stopping by to let you know that I have featured your project on Fun Family Crafts today! You can see it here
http://funfamilycrafts.com/fork-woven-spiders/
If you have other kid friendly crafts, I'd love it if you would submit them :) If you would like to display a featured button on your site, you can grab one from the right side bar of your post above.
Post a Comment