Thursday, August 26, 2010

"Pinkalicious" Cupcakes


The older children were off at a friend's house, yesterday afternoon, and the younger ones were feeling blue, at being left behind. So, to cheer them up, I read them Victoria Kann's Pinkalicious, and suggested making some "pinkalicious" cupcakes, of our own.


We added a reddish colored, pack of unsweetened, Kool-Aid, to our white cake mix...

...to turn it pink.


In the story Pinkalicious eats too many pink cupcakes, and turns pink. Her pediatrician prescribes a week of all green foods. Pinkalicious does not care for green foods, and cannot resist sneaking one more pink cupcake, during the night. She wakes in the morning to find she's turned an even darker shade of pink. So dark, in fact, she's no longer pink - she's red. Pinkalicious does not like being red, so she decides to eat her greens after all, and is restored to her normal color, just in time to discover, her brother has eaten the rest of the cupcakes, so he can turn pink, too.

We talked about how adding more, or less white to a color, can create different shades of the same color. Then, we tried it out in reverse with our frosting. I gave each of the children their own small bowl of frosting, and we added one drop of food coloring to the first, two to the second, and three to the third.


They mixed them up...


...and frosted their cupcakes (which turned out kind of a salmon pink, on the outside, and a very bright pink on the inside), with their different shades of pink frosting.


Then, for the final touch, they topped them off with an even darker shade of pink, sugar sprinkles, made by shaking a cup of sugar, with 4 drops of food coloring, in a plastic container, with the lid, securely, on.


The little ones were tickled pink with their creations, and their older siblings were green with envy when they got home, and found out what they'd missed.


You can find more story stretching arts, and crafts, at this week's stART (story + art) link-up, at A Mommy's Adventures.

It's great to be a homeschooler.

Wednesday, August 25, 2010

Geography and History - The Montana State Capitol

Photobucket"/>

While we were in Helena, on the weekend, we made a quick stop by the Montana state capitol building, for a short walking tour.


I've always thought that our state had the smiliest governor in the country, and now I know why. Look where he gets to work.


The sandstone, and granite building, which was built in the early 1900's (started in the late 1800's), not long after Montana became a state, is full of beautiful artwork, depicting historic events from Montana's past, and absolutely stunning stain glass panels, everywhere you look.


Montana Kids, has a child friendly write-up about the building, its history, and dark secrets.


Or, you can see some of it for yourself, and hear about a few of the finer points, brought out by a recent renovation, on the episode of Backroads of Montana, linked below. It's a Public Broadcasting series, sponsored by the University of Montana, and a great way to learn about the heart of the state. This particular episode was hosted from the capitol grounds.


Watch the full episode. See more Backroads of Montana.


Check out this week's link-up at Children Grow, Children Explore, Children Learn , for more fun with Geography, and History.


It's great to be a homeschooler.

Summer Fun - Water Games

We're trying to stuff all the hot weather fun we can into our last, few, waning days of summer. We had our first frost warning last night, already! But, yesterday afternoon was plenty warm enough to pull out the hose, with spray nozzle attached, for a few quick rounds of water limbo (thanks to A Magical Childhood)...


...water hurdles...


...water freeze tag, better known as big sister's target practice...


...and of course...


...chasing rainbows.

It's great to be a homeschooler, anytime of year. But it's just fantastic, to be a child, in the summer.

Tuesday, August 24, 2010

Foolish Houses Snack

When I was looking for coloring sheets to go with the "wise man built his house on the rock" activity, I saw this simple "foolish house" snack at Hubbard's Cupboard (I also saw a terrific mitten matching number activity on the same page, I'm going to have to go back for).

We modified the snack just a little, but the idea is still the same. The pudding topped with graham cracker crumbs, represents the sand, and the leaning graham cracker, is the foolish man's house.

About as simple as they come - but my kids were thrilled.

It's great to be a homeschooler.

The Wise Man Built His House Upon The Rock - Activity For Preschoolers

We pulled this activity from Let's Try It Out With Towers and Bridges, a Hands-On Early-Learning Science Activity book by Seymore Simon, and Nicole Fauteux. I hope to post more about this terrific series, later in the week. But, as we were learning about the importance of a strong foundation, for buildings, using play dough, and straws, I couldn't help but think of the parable of the wise man, who built his house on the rock, and the foolish man, who built on the sand (Matthew 7:24-27).

First we set up a tower. In our case it was three toilet paper tubes, that had been taped together for a telescope, some time before.


Just the tiniest breeze could knock it over, like a tree with no roots.


Once it was planted into a lump of play dough, even a much stronger wind couldn't knock it down.


Then we tried building a tower with straws, and play dough, again with a strong foundation.

When the storm came, it stood solid.


But when we took the foundation away...


...and our "foolish man's house went SPLAT!" Then, of course, we had to sing the song. Don't know the wise man/foolish man song? You can find the complete lyrics here, and listen to the first verse, and chorus, here.


And, you can find a printable coloring page, to go along with the lesson, here.

It's great to be a homeschooler.

Monday, August 23, 2010

Preschool Numeracy Play Dough Fun

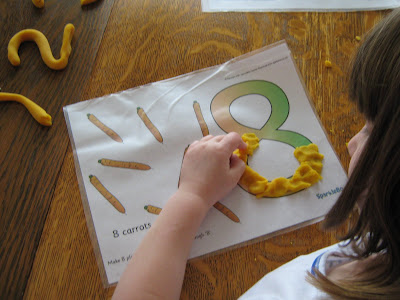
I tried to make some play dough snake letters with my youngest (age 4), but discovered pretty quickly, that while she has mastered rolling the play dough out into a snake, forming the snakes into numbers is still too hard for her.


That's when I remembered the play dough letter mats from Make Learning Fun, I'd seen on The Fantastic Five , and wondered if they had similar mats for practicing numbers. While, they have some terrific resources there, I didn't find exactly what I was looking for. But, the mats I wanted were only a click away, at Sparkle Box.


I downloaded, printed them, and had them covered in contact paper, ready for some math time fun, while the girls enjoyed a few minutes of free play with the dough.

They were just what we needed. It's truly terrific to have such wonderful resources, available for free (minus the printer ink, paper, and contact paper) at the click of the mouse.

You can find more math resources, activities, and ideas, and even some more numeracy play dough mats at the Math Monday link-up at Joyful Learner.

It's great to be a homeschooler.

Loch Ness Potato?


After seeing a cute, baked potato, dinosaur on the Love Potatoes site (don't ask me what I was doing there, sometimes my clicking gets out of control), I thought I'd be clever, and carry our dinosaur theme on into dinner. Since I'm new to potato art, I decided to make a prototype at lunch, for the Man of the House, to try out.

The Love Potatoes dinosaur was pretty fancy, with pepper scales, olive eyes, and creamed cauliflower filling. My children are not big fans of any of those things, so I decided to keep it simple, and use cheese for the extra details.

Trying to follow the directions for the dinosaur, I started with a potato.


I baked it in the microwave, and sliced a third of it, off the top.


I cut the smaller slice, into three pieces, trying to shape two of them to look like a neck with a head, and a tail.


Those went into a 450 degree oven, brushed with olive oil, for about 15 minutes, until crisp.


In the meantime, I hollowed out the bottom of the potato, and mashed the filling with sour cream, and cheese.


I cut some additional triangles, of cheese, for feet, and scales.


Then, I returned the filling to the potato shell, and placed the "feet", underneath the front end.


Once, the potato slices were browned, or at least starting to get crisp, I removed them from the oven, and stuck the head, and tail pieces into the filling.

Finally, I added the cheese scales, and eyes, which basically I just pressed into place, letting them melt enough against the hot potato, to stick. It was easy enough with the eyes, but the scales were tricky.

I proudly presented my husband with his dino-lunch, only to have him ask me, with a crooked smile, if we were starting a unit study on Scotland.

I think I'll go back to baking cookies! But then, a unit study on Scotland, might not be a bad idea, after all. Loch Ness, here we come.

It's great to be a homeschooler.