Saturday, January 8, 2011

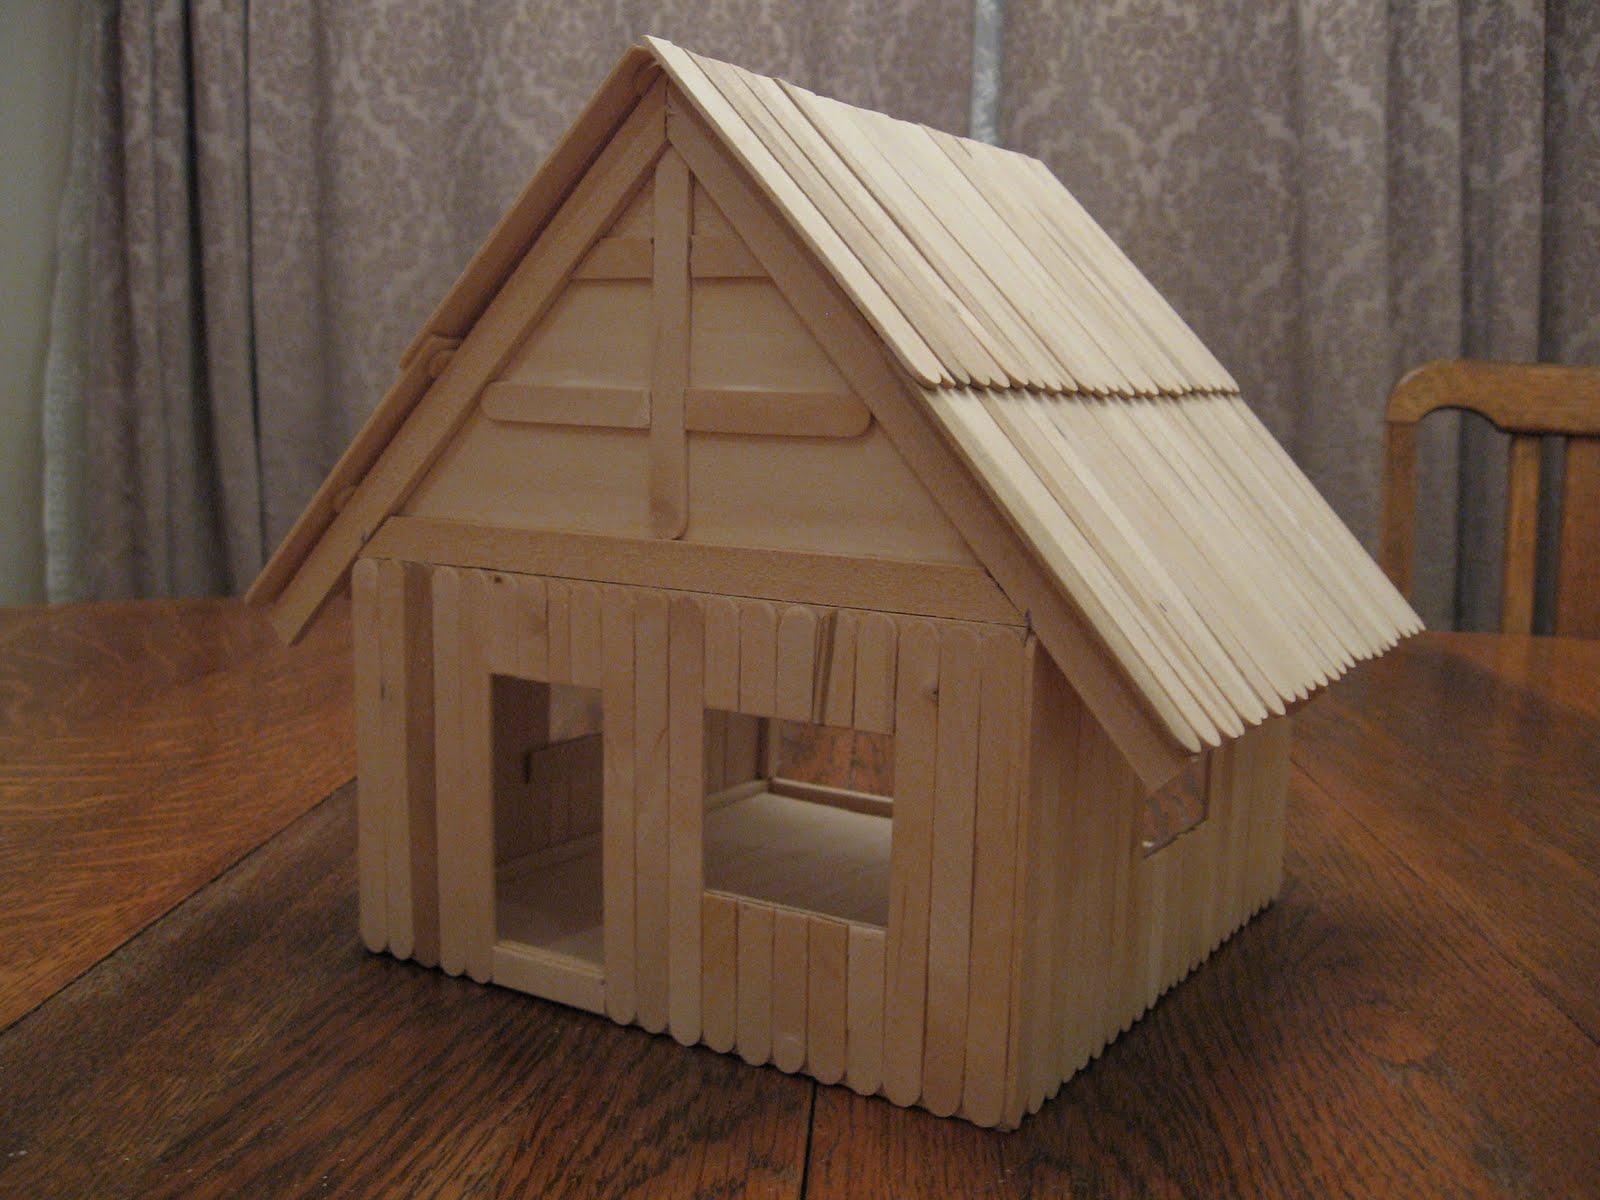
Basswood and Popsicle Stick Doll House (Man of the House Style)

It's not all that unusual for the Man of the House to take up toy making for the children. And, I knew he'd been watching my progression into the world of Popsicle stick houses with interest. But, I was somewhat flabbergasted when he returned from a trek into "the city" on an automotive errand, with craft supplies from not only Walmart, but Michael's, as well.

Even more astounding, was the fact he hadn't called me from either store, to see if their was anything else he should pick up...like polyfill, safety eyes, a skein or two of yarn...okay, so maybe it was just as well he didn't call, my list probably would have put a major dent into our post-Christmas budget. Besides which, he agreed to make amends by photographing his house building steps, and writing up a guest post, tutorial for me - which you'll find below.

We do tend to approach projects from opposite ends of the organizational spectrum, as you can see from the side by side view, my latest house, next to his.


I hope you'll enjoy the temporary change of perspective.

After seeing the construction of a couple Popsicle stick houses built by the Lady of the House, I felt compelled to construct one of my own, done a little bit different with the addition of Basswood materials I found at Michael's Arts and Craft Store. Please follow along as I construct my own version of a little Doll Bungalow.

The picture below shows all the materials I used to construct my little doll dwelling. I must say the Basswood works fantastic for projects like this, it cuts, and carves like a knife to a bar of soap, and is fairly inexpensive at under $10.00 per bag, as shown here. One bag was more than enough to complete the project with materials left over.

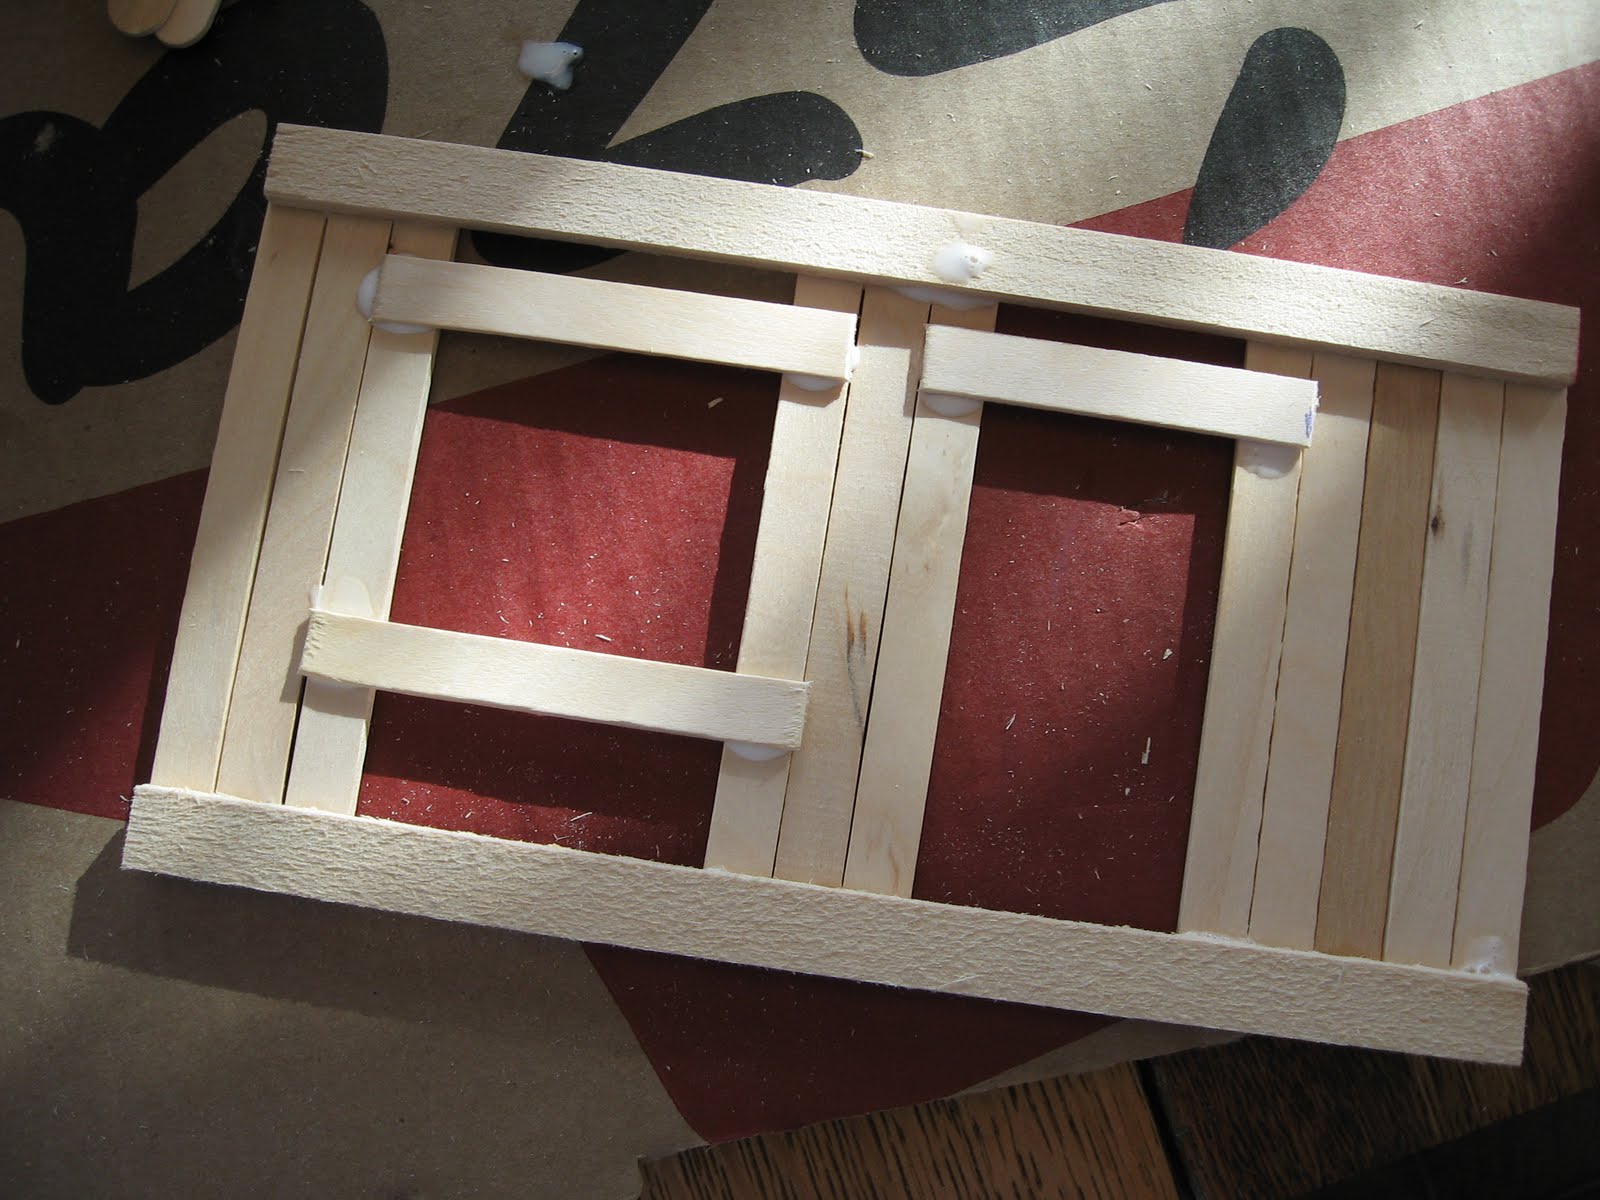
The first wall I constructed, I used 2 of the Basswood sticks spaced at the full length of the Popsicle Sticks as a top and bottom board, they were 8 inches long, you can see how many sticks were used and that I had to split one down the middle to get full coverage, in the following pictures you will see how I constructed the framework for the windows.

In this lower picture you can see the frame for the window on the inside of the wall, the Elmer's Interior, Glue-All worked great, as it was very fast drying, and sticky enough when wet to keep my pieces firmly in place. You will want to choose your top, and bottom at this point to make sure your windows are constructed at the same height.


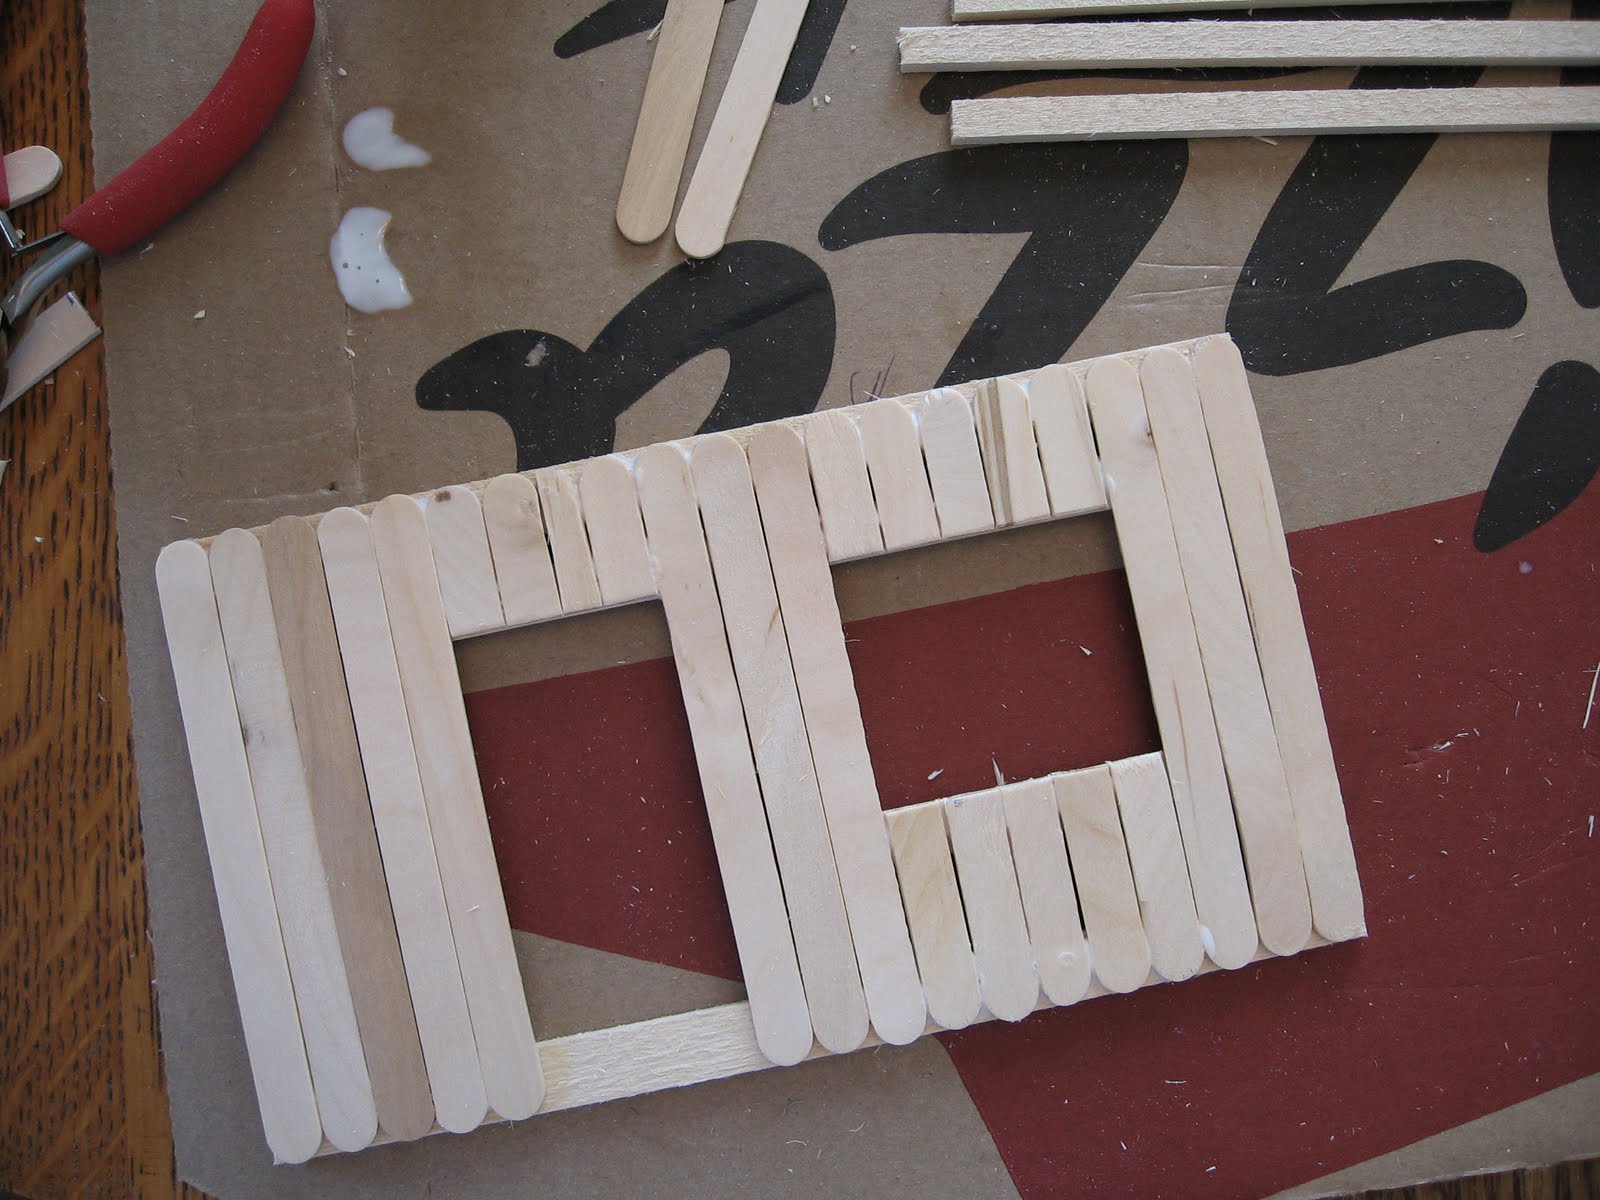
This picture shows the construction of the front wall, there are only three walls to this house so the girls can have access to the rear of the house for their dolls. The house dimensions front, side and rear are 8 inches square, wall height is the length of a Popsicle stick. In this picture I am constructing a front door opening and front window that is a little larger than the side windows.

In this view, you can see my framing for the door opening, and front window, the dimensions used here were just eyeballed at this point, what ever looked correct I ran with and it seemed to work well. It's a guy thing.
A flipped over view of the front, here I am about to finish the siding after installing the frame work, I had only left this alone to dry for ten minutes or so, the glue was drying very quickly.


The finished front wall - from start to finish, each wall only took about 30 minutes, Elmer's Glue-All is fantastic!

Here I am fitting the walls to the floor. The floor is 8 by 7 and 5/8 inches, and is constructed with Basswood sticks, and small sheets of Basswood, that were included in the bag from the store, they worked great, just like a sub floor in a real house.


This is how I constructed the floor from the bottom side, any cutting, or trimming of the Basswood was easily accomplished with my razor knife, like I said earlier this wood is like cutting soap, very easy to fit just the way you want it.


Now, I have my walls glued to the finished floor, all went together very well, please note the back remains open for access.


This is another view, and at this point you will want to make sure your walls are even along the top, this will make mounting the upper floor, and roof trusses much easier, and keep their alignment true.


Here is the challenging part, I took two Basswood sticks the same measurement of 8 inches, and laid them flat at a 90 degree angle from each other, with one end lying on top of the other end. I traced with a pen, making a square. I then drew a line corner to corner making a 45 degree angle for the pitch of my truss. Make sure the other stick's angle is opposite, so when glued they make a triangular truss.

This is the finished product, two angle cuts to form my truss, I know this seems like it's being over engineered for a doll house but it's a guy thing.
Stay with me now, you will need to construct 3 sets of these for the roof.

In this picture you can see I have cut small triangles to help support, and strengthen the truss, don't make them too large, or they will be in the way of little hands.


This is what the finished truss should look like.


In this picture I am cutting small pieces to be mounted on top of the walls, in between each truss for support, and to fill in the gap, you will see later how it will look.


This is how it will look, please note the gap cut in the middle for the center truss. Later, I will add a second stick on top of the first ones to add more support and help the roof fit better. There is an official name for these boards in the construction world, but it escapes me at the moment.


Here I am fitting the center truss, getting it mounted dead center, and level so I can make marks on either side, the marks will help me mount it correctly when glue is applied.


Wait a minute! I almost forgot to get the second floor loft framed in, and glued down, the next few shots show how I made that all possible.


Please make sure, that your framing is straight, and level, or else the Popsicle stick floor will look like a roller coaster.


The floor went on very well, and measured out just right with an even amount of sticks. Along the front wall I did cut the rounded ends off so they would mount flush.


Alright, back to the trusses. See, here I am using a ruler to make sure the truss is mounted dead center as it spans over the walls. Here is where I will make my marks to make it easier when the final gluing is done.


The pen is pointing to the marks I made.


The first one is glued, and placed in the middle. It went on without any problems.


This is the front truss. I am cutting Basswood sheets to cover it up, for my siding later on.


Here, I have mounted the second row of sticks for added support for the trusses, like I said earlier, there is a correct term for those boards.


Now, the front truss; make sure they line up with one another if you try this, making the measurements, and marks earlier, made this easy for me at this stage.


Now, the rear truss; it's looking more, and more like a doll house. Please note, that after I placed the three trusses up, I let it sit over night to dry. I didn't want to risk knocking them down, while trying to place the roof sticks on.


Here I am placing Popsicle sticks along the top, middle and lower end on each roof slope, these will serve as my mounting surface for the roof which will be two rows of Popsicle sticks. I did have them overhang a little bit, on the front, and back to give the look of an eve.


Time for the roof, I did the bottom row first, and on the upper row overlaid the sticks for a true shake roof look. Please note I did split one stick on the top, and bottom, so that the sticks would be staggered, you can see by the pictures what I am talking about.


I repeated the same, on the other side.
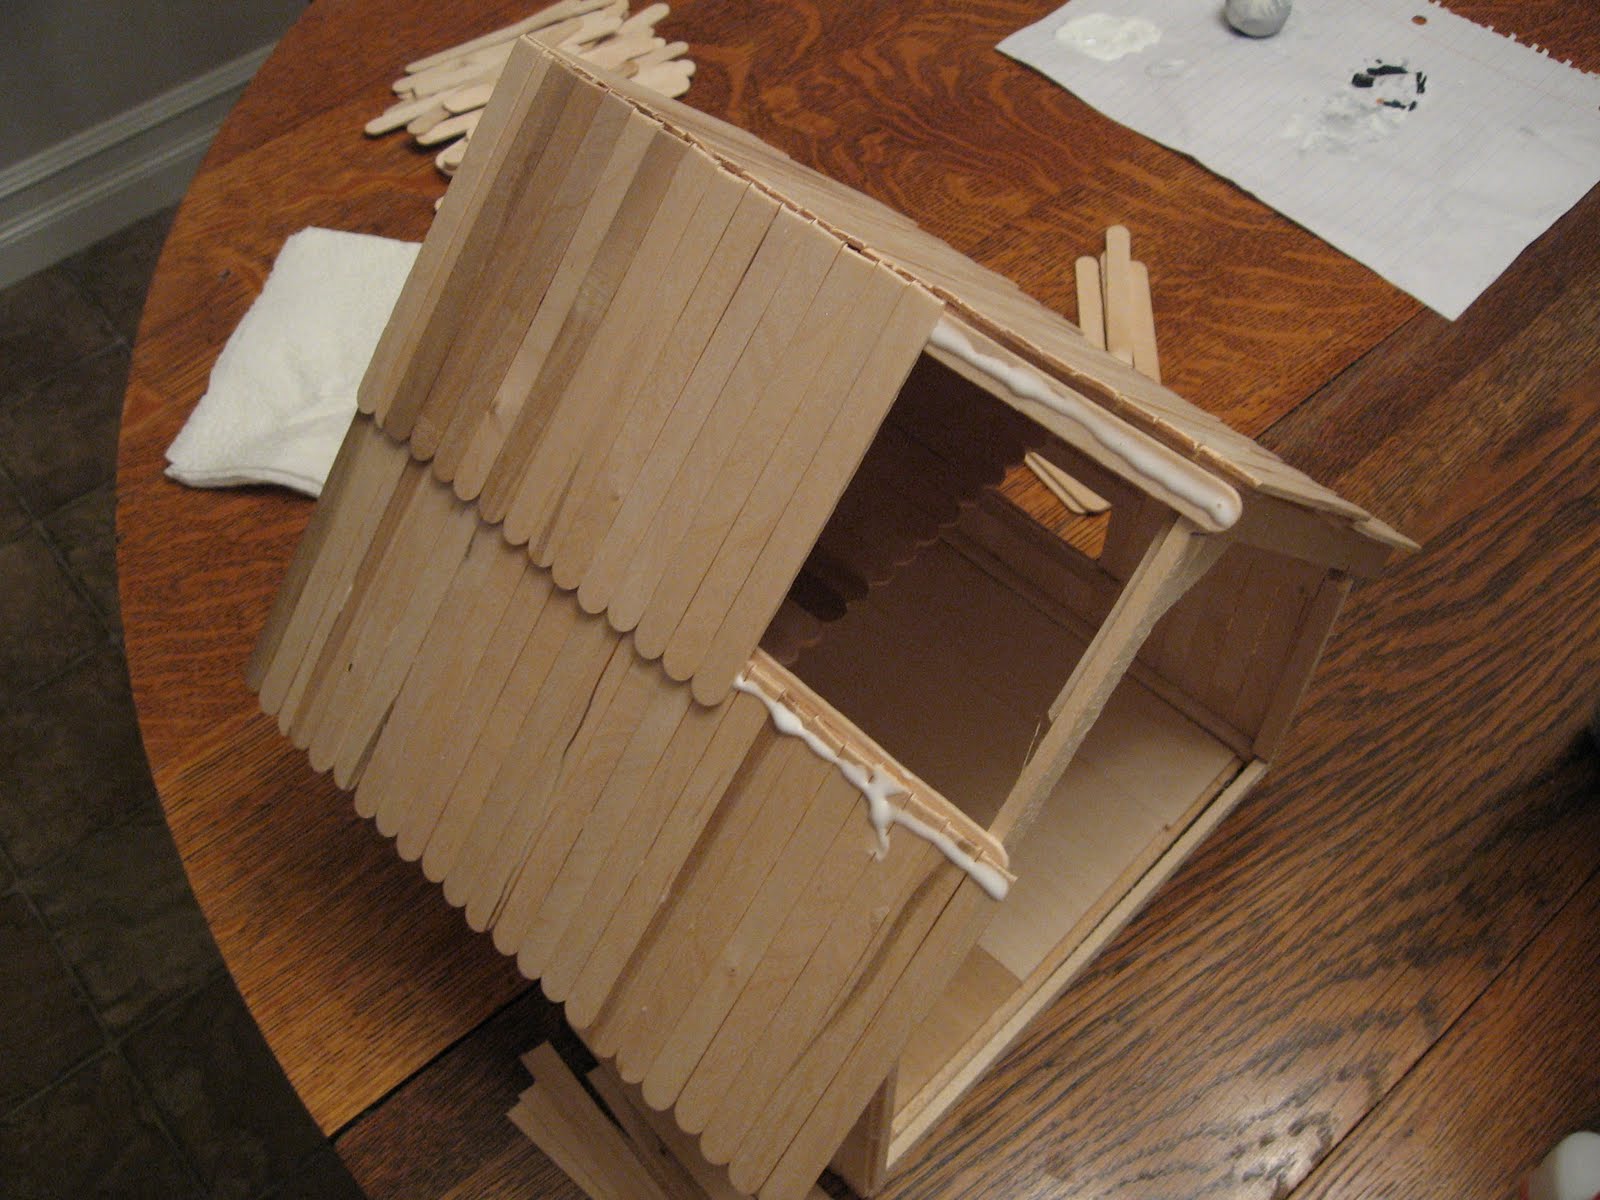

Almost done, I need to do some work on the front, and get a ladder made for the loft.


Here I am cutting, and fitting a stick, that will help frame the lower end of the gable.


It was a perfect, well almost perfect, fit.


This picture is some small trim pieces I cut to mount to the front gable wall.


Here I am constructing the stairs for the loft area, this took some carefull cutting.


But, it worked out just the way I had hoped, with the ladder functioning almost as stairs.


Here it is, the finished product, ready for carpeting, and paint. I'll leave that step to the children.


As the Lady of the House likes to say, it's great to be a homeschooler.

Friday, January 7, 2011

Cereal Box and Bread Clip, Counting Frame, Abacus


I had to chuckle, at a comment yesterday, from Natalie at Mouse Grows, Mouse Learns, asking if I had taken Debbie's bread clip and tie dilemma, over at Children Grow, Children Explore, Children Learn, as a personal challenge.

I had planned yesterday's peanut pal craft (which used bread ties), before I read Debbie's post (click the link above to read it).

But, her post did get me thinking about the large amount of bread clips, congregating in my own kitchen, and on the sad state of my cupboards, which could use a good cleaning out, too.

After all the Thanksgiving, and Christmas baking, cleaning out the cupboards is going to be quite a job. Dealing with the bread clips (at least 100 of them), was much easier.

I started by cutting the front off of a tall cereal box. It's important the box be at least 1 foot tall.


I trimmed, and tape the top closed, for stability.

Then, since my box had printing on the inside, I glued a piece of construction paper on the inside of the box.


Using a ruler, I drew a line down the center of the sides, as a guide, and marked off each inch.


With a hole punch, I punched 10, evenly spaced holes, at the inch marks, on each side. Actually, I made 11, because I wasn't sure if I'd want to go higher, or lower in the box, but I only used 1o of the holes.


I strung 10 bread clips (of the same color), onto a wood dowel, 1/2 centimeter in diameter, repeating until I had 10 clip laden dowels.


Then, I threaded the ends of the dowels through the holes in the box.


I secured the dowels in place, by wrapping pieces of tape around them, on the outside of the box.

Finally, I added number labels to each dowel, indicating the amount each clip represents on that dowel. Children, already familiar with counting frames, probably wouldn't need the labels.

It can be played with standing up, or laid down, but we found the clips were easier to move quickly, when the box was laid down.


Now, with the fun out of the way, I'm off to face the cupboards.

P.S. - I realized as we started to play with it, that there should only be 9 clips on each dowel, and so we removed one from each.


It's great to be a homeschooler.

Thursday, January 6, 2011

Peanut Shell Pals


We were left with quite a few smashed up peanut shells, after making peanut butter, yesterday.


But, a few came apart pretty much in half, and we used those today, to make Peanut Pals, following instructions from Show Kids The Fun.
It's a fairly fussy craft, that requires a delicate touch, so I worked with the children one at a time, and gave the younger children a good deal of help.

When they came to the table, each child chose the color of embroidery floss they wanted for hair, and specified (or cut their own) length. Then, they picked the two matching halves of the shell they wanted, googly eyes, and two bread ties.


We coated the edge of each shell with glue (I did this for the younger children). Then, we gently sat on the hair, and bread ties (we cut the ones for the arms, and smaller peanut shell legs, in half).


We pressed the other half of the shell, on top.


The children glued on the eyes, and drew mouths, with markers.


And, we sat them aside to dry.


When they were dry, we bent the arms, and legs, to pose them.


Tip: It is much easier to stand Peanut Pals with shorter legs, and it generally takes two, leaning against each other.


It's great to be a homeschooler.

A Play by Play of One Day of Almost Unschooling


Do you ever wonder what we do all day? I know I do.
Between Thanksgiving, and Christmas, I heard about a fun link-up, through Live The Adventure, going on over at Books and Bairns. The idea was to share a 24 hour slice of your homeschool life - all the things you managed to get done in a day, and the things you didn't.

It sounded like fun, but of course, I completely missed the dates, and didn't think about it again, until yesterday. It might be too late for the link up, but I thought it might still be fun to record a day - just one day. Everyday is a little different around here, so it's not a complete picture, but if you ever wonder, just what we really do all day, here's a glimpse.


6:00 AM - I get up, have breakfast with the Man of House, and see him off to work.

6:45 AM - I spend a few minutes checking emails, and reading blogs. Then, Google about for a good online lesson for Algebra 1, graphing inequalities, which T was struggling with, yesterday (I settle on this one, and save it to favorites).

7:30 AM - I start to make muffins for the children's breakfast, and listen to a few minutes of National Public Radio. Apparently, the job market is bleak, even if the numbers are looking better, and the price of oil is rising.

7:50 AM - I hear a noise in the living room, the children are up. I put the muffins in the oven, turn off the radio, and click over to a National Geographic video clip on Adelie penguins. Leaving T, in charge of the continuing running nature clips, I jump into the shower.

8:15 AM - I come out to find the penguin clips have given way to shark clips. D is delighted. C wants to play "paint" on the kid's computer, and A has removed herself to a corner to read a couple of chapter of Joshua. I throw a load of laundry in.

8:20 AM - The children eat breakfast, while listening to Living Language "Starting Out In French". We alternate between listening to the CD, copying out vocabulary from the downloadable transcript, and acting out the skits at the end of the chapters.


8:45 AM - C is removed to the family room to watch Dora, on the Wii (via Netflix). The older children start rotating through showers, Bible reading, typing practice (Garfield Typing), and piano practice. D, picks up a Lego magazine to peruse, and E discovers the Man of the House has finished his Popsicle stick house for her and C, and begins to move her dolls in. I clean up the kitchen. The day has started.
8:45 to 10:00 AM - I continue to try to clean the kitchen, while helping T work through what he learned in the Algebra video, as he begins to work through graphing inequalities in his text (Algebra Success in 20 Minutes a Day by Learning Express). After, three problems, he "gets it", and is able to work on his own.

A, works independently on division problems from http://www.aaamath.com/.

The younger children play, and get bathed, with G's help.

10:00-11:00 AM I call my mother, and work on laundry. Baths, and general piano, typing, and math work continue.

C, switches from the paint program on the computer, to the Fancy Nancy interactive coloring pages.

G, and D start an "epic" Nerf battle.

A, and C work together on a Lite-Brite picture.

E, plays with her Boggle Jr. game.

I make calls around town in search of more polyfill for the amigurumi penguins, and find no one in town sells polyfill.

11:00 AM - 12:00 PM The Man of the House comes home for lunch. Somehow, everyone is bathed. T has completed algebra, typing, piano, and Bible reading. A has completed math, typing, Bible reading, and piano.

While eating, the children watch part 1 of Modern Marvels' program about George Washington Carver, off of YouTube.

The Man of the House goes over pictures with me, he would like to include in an upcoming guest post (more on that later!).

12:00 - 2:30 PM G completes typing, math (also from aaamath.com), Bible reading, piano, and does a reading lesson with E (from Teach Your Child to Read in 100 Easy Lessons).

E works on a couple of pages from her workbook (Grade 1, Comprehensive Curriculum of Basic Skills from American Education Publishing), and practices piano.

A, teaches E another addition story from Judy Liautaud's Addition The Fun Way! A Picture Method of Learning the Addition Facts.

C, has a reading lesson with T, and works on her workbook (School Zone's Big Kindergarten Workbook).

D, does a couple of pages in his workbook (American Education Publishing's Grade 3, Comprehensive Curriculum of Basic Skills). I ask him to read out loud to me, from our Little Critter Treasury, but he has a headache, and wants to play quietly with his Legos. I make mental note to watch him for signs of eye strain, and double check our supply of cold medicine.

I clean the kitchen again, vacuum, and throw in another load of laundry. Then, run to the store, to pick up medicated lotion, for one of the children's extra dry hands (winter in Montana!).

I see the peanuts are on sale, and decide to pick some up.

Nap time is delayed half an hour, so we can make homemade peanut butter.


2:30 PM The little ones go down for a nap, while the older children go for silent reading. T reads a simple biography of Henry Ford, G reads a biography of George Eastman, and A finishes up a biography of George Washington Carver. D plays quietly with his Legos, and reads a couple of picture books about sharks.

I make peanut butter cookies, move laundry to the dryer, clean the kitchen - again, blog about making peanut butter, and start dinner.

5:00 - 6:00 PM The Man of the House comes home from work. He discovers I went out the store, but forgot to pick up milk (oops). We run back out to the store, while the older children play Roblox on the computer, and the younger children watch video clips on Nick Jr's site.

We eat dinner.

6:00 - 7:30 PM G goes to AWANA, and the Man of the House goes to the gym. I clean the kitchen - AGAIN.

A plays Candyland with C. It's a new game to us, so A must read the directions before they can play. I stop to clarify a few problems (there's not a "start" space on the board), and then fold laundry.

E watches episodes of Word Girl, and plays games on PBS-Kids.

I play a couple of rounds of Just Dance Kids, and a Nerf game on the Wii with T, while D cheers us on.

The Man of the House returns from the gym, and helps the available children call to wish his mother, their grandmother, a happy birthday, and then goes to pick up G.

I take a quick shower (thanks to Just Dance Kids), while the children put on pajamas, and get ready for story time.

Since, G is late home due to AWANA we opt to save the rest of Modern Marvels for tomorrow, and I read a chapter of Carole Marsh's The Mystery of the Ancient Pyramid, part of the "Around the World in 80 Mysteries" series.

8:00 - 8:30 PM The Man of the House puts the children down to bed, while I read a few blogs, visit the library website to reserve a couple of books I saw recommended on the blogs, and Google around for a craft idea for stART tomorrow.

8:30-10:00 PM I watch 1970's Battle Star Galactica with the Man of the House (we're feeling nostalgic for our childhood), and crochet another penguin, making a mental note to order more polyfill, online. On most nights I spend some time on Wii Fit, while T watches a history DVD with the Man of the House, then we watch something together, but they're between disks, and I'm worn out from dancing.

10:00 PM Devotions, and bed. I'm wondering where the day went, and wishing it were a few hours longer.

It's great to be a homeschooler.

Wednesday, January 5, 2011

Homemade Peanut Butter


We had an absolute blast, making peanut butter, this afternoon, in response to Barbara Mitchell's A Pocketful of Goobers, A Story about George Washington Carver, and the beginning of Modern Marvels' biography of Dr. Carver (you can view it in 5 parts on YouTube, starting, here).

Dr. Carver did not invent peanut butter. Dr. George A. Bayle, Jr. came up with the idea in the 1890s, as a high protein substitute, for people with poor teeth, who could not chew meat. But, Carver did so much to forward the peanut, as a cash crop, that it seemed only natural to follow up his biography with a peanut project.

So, when I ventured out, on an errand, to the store, and saw the big bags of roasted, but unsalted, peanuts, in the shell, were half price, I thought giving peanut butter making a try might be fun. And, it was.

We shelled about 3 cups worth. It was a big (and messy) job, but it went quickly with all six children working. This would probably not be a good task with toddlers, as peanuts are a serious choking hazard, or obviously, for anyone with peanut allergies - though I hope our blogger friends, with such allergies, will enjoy watching the process from a safe distance.


As we worked, there was lots of time for discussion about peanuts (where, and how they grow), and past presidents (and more importantly, what was in their candy dishes, and why do presidents need candy dishes, anyway?).

Finally, we chopped our shelled, and husked nuts, in the blender.


We added two tablespoons of vegetable oil (probably one tablespoon would have been enough), and 2 teaspoons of sugar (because I know my children), and continued blending, until we had a peanut butter like texture.

As, I said, we might have added a touch too much oil, as our peanut butter was quite thin. It had a strangely dry texture, which was off putting to those sampling it right from the spoon. The flavor was good though, and the older girls enjoyed it on toast.


I think it could be saved for a few days in the fridge. I'm really not sure, because I used up the rest of ours (we had one cup left, after the sampling, and toast), to make our favorite peanut butter cookies.

1 cup peanut butter
1 cup sugar
1 egg

Mix together, and roll into balls. Bake, on an ungreased cookie sheet, for 10-12 minutes. Push a chocolate chip into the middle of each cookie, immediately after removing them from the oven.

Our cookies, with the runnier peanut butter, spread more than usual, so I had room to add several chocolate chips. They'll make a nice snack tonight, as we watch the rest of the Modern Marvels' biography.

It's great to be a homeschooler.