Showing posts with label Folk Toy Fridays. Show all posts

Saturday, June 25, 2011

Folk Toy Fridays - Folk Instruments - Paper Cup Cuicas

Did you know, that the sounds of a soda pop covered, plastic straw being raised, and lowered in a paper cup...


...are very reminiscent of a cuica (kweeka), a Brazilian folk instrument, used for percussion in samba music?

Check out the video above, and then this YouTube video of a cuica, if you don't believe me.

The children managed to get a pretty good range of sounds from their cups, before I had to curtail the music lesson, in response to angry glances coming from the quiet people at the table next to ours (clearly, they were not homeschoolers, or bloggers).

Actual cuicas, or laughing gourds, are open drums with a stick attached to the middle of the drum membrane, that can be rubbed with a wet cloth, to produce a high pitched range of sounds, sort of like the cackling cups we played with last summer. But, the straws in the cup lids, sounded a lot more like the real thing, to me, and were pretty simple to make.

  • Fill fast food cups with soda pop.

  • Add lids, straws, and children with a few minutes to kill.


And, just like that, you have a band, or at least a pretty good percussion section.


It's great to be a homeschooler.

Sunday, June 19, 2011

Homemade Marbles


I didn't forget about Folk Toy Fridays, this week, I just delayed it, so I could make some marbles with the children, as a way of sharing a story with them about my father, on Father's Day.

He died when I was nine, so I don't have a lot of stories to share, but I do know he loved to whistle, loved to fish, and when he was a child, he loved to play marbles.

Apparently, he was pretty good at the game, too. According to my aunt, he used to skip class, so he could stay out for recess, to play marbles with the older boys.

My grandparents didn't approve of the truancy, and they didn't approve of gambling. So, when they found out he was playing keepsies, they insisted he return the marbles he had won.

Rather than suffer the embarrassment of having to return his winnings to the older boys, he buried them in the flower beds around his house.

I'm not sure how accurate the story is, but I do know, my mother, who bought the house in later years, has a jar full of marbles, that surfaced one by one, over the years, around her flowers.

Someday, she plans to dole them out to the grandchildren. In the meantime, we made a set of our own, to play with now.

Being a child of the '30s, my father played with the traditional glass marbles, you can buy today. But, long before 19th century, German glass makers invented marble scissors, for molding glass into balls (there's a Dirty Jobs episode about the process, you can view here, on the Discovery Channel), marbles were made of many different things, including clay.

In fact, you can make pretty nice marbles for yourself out of baked polymer clay. Unfortunately, all but a tiny bit of our polymer clay decided to be non-cooperative...


...so we had to use play dough instead...


...which of course cracked when we baked it (I put them in the oven at the lowest setting for a couple of hours until they were dry). The few polymer clay marbles we managed to make, turned out nicely, though.


The children had a great time mixing the play dough colors, and seeing how they swirled, and blended together, as they rolled them into balls. It was really a lot of fun. And, it made for a great backdrop for the story I wanted to share with them, about my father.

Today, we gathered up our marbles, cracks and all, and enjoyed a few rousing rounds of Ringer.


It's great to be a homeschooler.

Friday, June 10, 2011

Folk Toy Fridays - Balloon Spinners

Okay, a balloon spinner is not actually a folk toy, but it's in the general, spinning toy type, folk toy tradition. Besides which, when I first saw it in Arvind Gupta's Toys from Trash pages (where there are too many good ideas to even begin to mention - but thanks to Kate at Mini-eco, for introducing us to them, and to Crafty Crow, for introducing us to Kate's fine site), it reminded me of a spool tractor, which we have made before, and which is a folk toy.


It doesn't turn out to be like a spool tractor at all, but spins around in a wild, crazy, kid pleasing fashion, instead. And, it is so simple to make.

It's so simple, in fact, I was sure it wouldn't work, and decided to put one together, before the children got up this morning, just in case. To make your own, all you need is a balloon, a bendy straw, some string - or if you're like us, ribbon, and a pair of scissors.


Cut, the long end of the straw, so the straight bits are the same length on both sides of the bendy part, and bend it into a right angle.


Tie the balloon, tightly, onto one of the straight parts of the straw (this is not at all as tricky as it sounds).

Blow the balloon up, by blowing through the other end of the straw. If air leaks from around the string, just pinch the neck of the balloon, as you are blowing, and when the balloon is inflated, it will bulge against the string, and probably not leak too much air. Keep the balloon plugged, by placing your finger over the end of the straw.


Set the spinner on the floor, and let it go. Depending on the angle of the bend in the straw, the balloon will either spin very, very fast, or quite slowly.


I'm thinking this would make a great waiting-for-the-parents-to-arrive activity at the end of a birthday party, or maybe even at VBS, or for one of those Mom-I'm-boooored moments, this summer.

It's great to be a homeschooler.

Friday, June 3, 2011

Folk Toy Fridays - Flying Saucer Spinning Tops


Okay, flying saucers aren't really folk toys. But, spinning tops are folk toys, or at least incredibly old toys. And, the simple tops we found in Mary Blocksma's Action Contraptions: Easy-to-Make Toys That Really Move, remind us of a flying saucers, as they spin across the floor.

To make one of your own, you need:


  • A round, plastic lid. We used one off of a coffee can.

  • A ping-pong ball. Any smooth ball might work. We made one with one of those play-place type balls, and it worked even better, especially for small hands to grab, and spin, than the ping-pong ball.

  • A quarter, or something round, with a slightly smaller diameter than the ball you want to use, to trace around.

  • A pen, that will write on plastic.

  • Scissors.

  • And tape, though this one is optional. It is meant to keep the ball in place, but we found they fit tightly enough, that it wasn't necessary.


Trace around your quarter, or other round object, in the center of the lid.

Cut the circle out. You might need to enlarge the hole some if the ball won't fit into it at least 1/3 of the way through. We found a milk cap was closer to the size needed for a ping-pong ball, than a quarter.


Push the ball somewhere around 1/3 of the way (or not quite half-way) through the hole. Tape it in place, on the bottom side, if desired.


Spin the ball between your thumb and first finger to start the top. The children liked the larger ball better, because they could spin, and drop it from above the table. The ping-pong ball top had to be spun right on the table.


According to the book, you can make a larger version, using a paper plate, and add a ring of clay around the outside edge to make it spin even longer. I thought we'd try that too, but we were having so much fun with the simple version, it didn't seem necessary.


It's great to be a homeschooler.

Friday, May 27, 2011

Folk Toy Fridays - Hand Propeller

I would probably call this toy a helicopter, but I've seen it referred to as a hand propeller, Chinese top, or bamboo dragonfly. At any rate, it has a less interesting name than some of the other folk toys.

HistoricalFolkToys.com writes, that the toy has an Asian origin. They also claim, a similar toy was given to the Wright brothers, by their father, when they were children, and helped to inspire their interest in flight.

My own children have played with inexpensive plastic versions, brought home from birthday parties, and children's fairs. We've always enjoyed playing with them. But, making a few ourselves proved educational, fun, and surprisingly easy.

Our supplies were pretty basic - an empty cracker box, bendy straws, scissors, a ruler, and a hole punch.


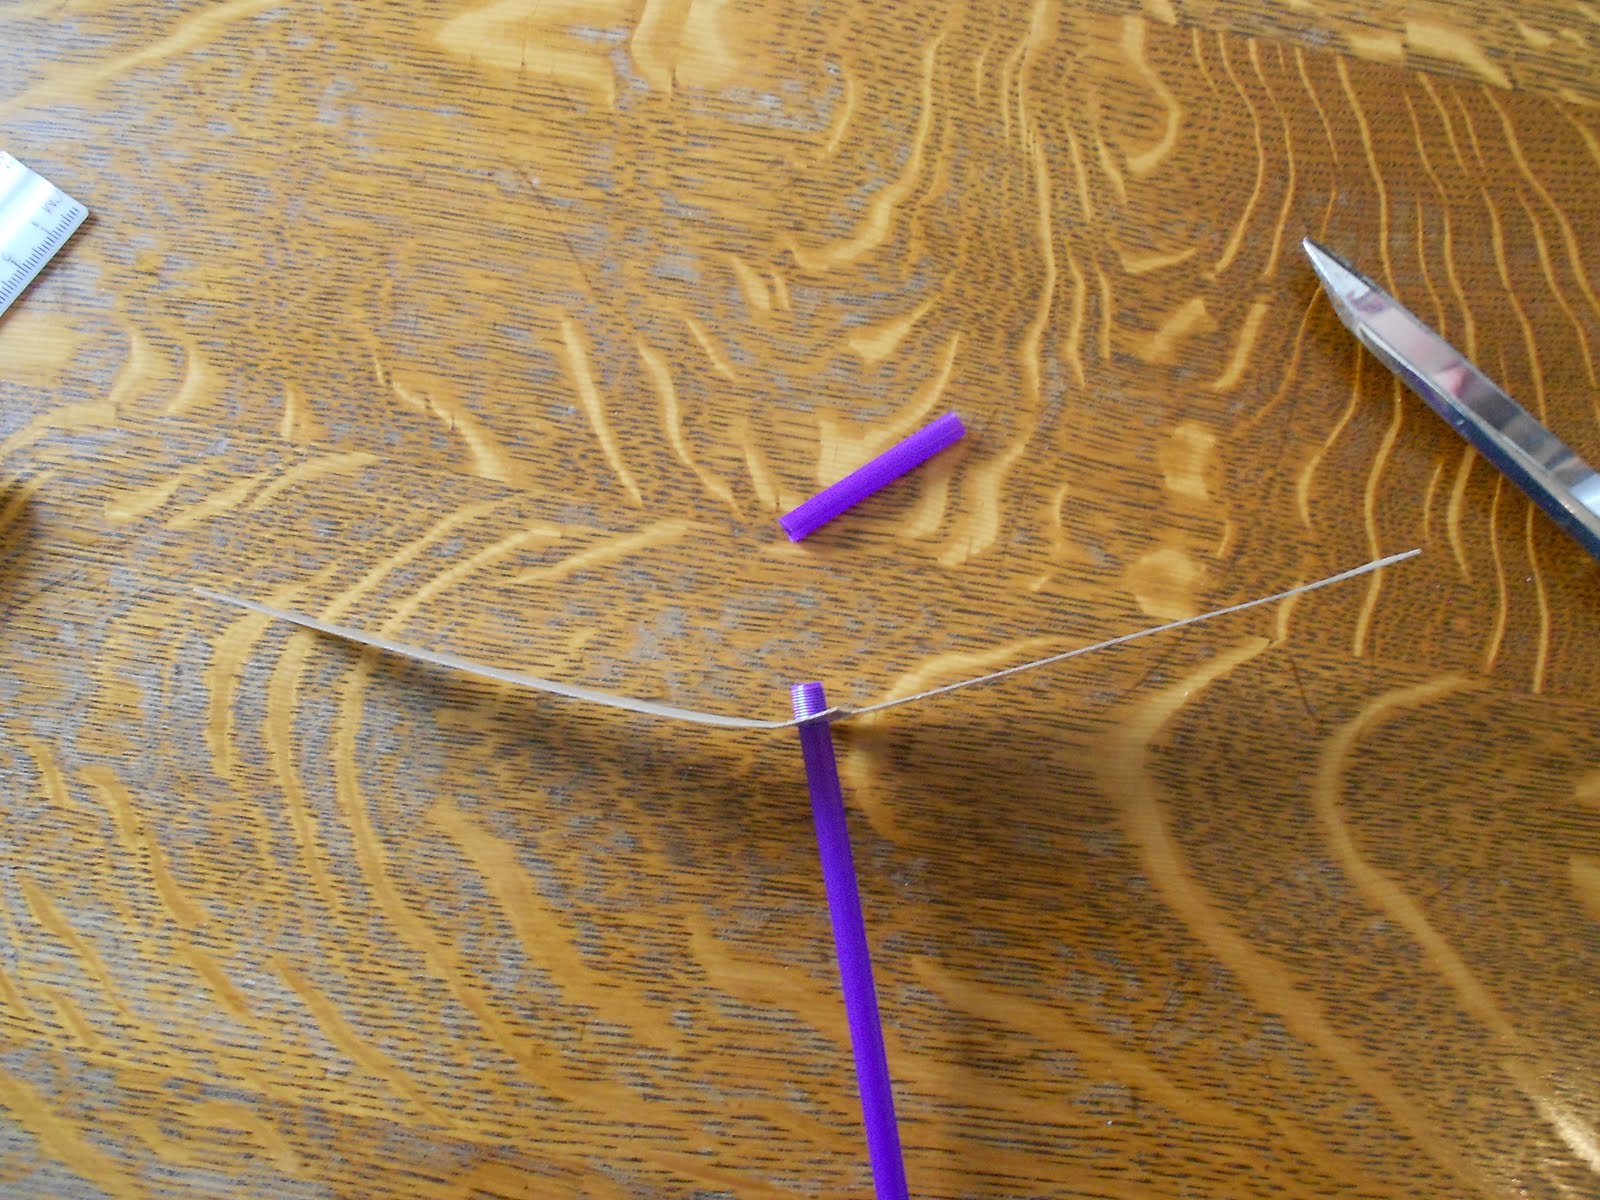
We started by cutting a strip of cardboard, from the side of the box, somewhere around two inches wide, and 9 inches long, more or less.


We folded it in half, bringing the short sides together, to find the middle.


Then, we started at one end, and cut away about a half inch from the top of the horizontal side, toward the middle. We did the same, but cut away from the bottom of the horizontal side, once we crossed the middle (see the picture below).


We punched a hole in the center (or pretty close to it) with a hole punch.


Pinching the bottom of the straw, we slid it through the hole, until it caught on the ridges of the bendy part. The straw was a tight fit in the hole, so we didn't need to add any tape to keep it from moving around.


But, we did trim the top of the straw, down to the ridges.


After giving it a test flight, we trimmed a little more off of each side of the propeller, and bent the ends up a little. Then, we made several more, so each child could fly their own.


Which they did, by holding the straw between the back of one palm, and the fingertips of the other hand.


Then, they pushed their second hand forward, spinning the propeller towards, and off, the fingertips of the first hand.


Our hand propellers acted with a boomerang-like action, flying up and forward, and then down, and back toward the launcher.


But, they fly differently, depending the length, and shape of the propellers, and how they are bent, leaving room for experimentation, and play.

It's great to be a homeschooler.

Friday, May 20, 2011

Folk Toy Fridays - The Whimmy Diddle


Honestly, I'm not making these names up! You can see an old fashion style whimmy diddle, also called a gee-haw, or hooey stick among other things, in the picture below from Wikipedia.


We followed instructions from The Science Toymaker , and used a one foot long piece of wire hanger, instead of a notched branch. Click the link for step by step instructions, and a short science lesson behind the toy. Most of the old folk toys use some level of science, both in their construction, and use. And, The Science Toymaker, a favorite site of ours, explains many of them.


The Man of the House was good enough to cut the hanger, with wire cutters, and shape it, with needle nose pliers, along the lines of the instructions (older children could manage this without any trouble).


So, all we had to do was cut a piece of cardboard into a three inch by one inch propeller, and punch a hole in the center, with a hole punch.


After sliding the propeller onto the end of the hanger, just in front of the little loop, you hold the wire by the larger loop, and run a pencil, at a slight slant, over the bumps in the wire. If you do it right the propeller will spin.


It's just tricky enough, to make it fun for the whole family.


As a post note - after publishing this post, I did a little more research, and discovered the gee-haw name comes from the fact that you can change the direction of propeller spin, by changing the direction you run the pencil across the bumps. In our case, that didn't work, but running the pencil along the underside of the bumps did. We thought that was pretty neat.


It's great to be a homeschooler.

Friday, May 13, 2011

Folk Toy Fridays - The Flipperdinger

Okay, I'm not kidding, Flipperdinger is actually this toy's name, or at least the old folk toy this toy is based on. I didn't make it up. Though, I did simplify the toy, to make it possible for the kids to create on their own.

My thinking is with summer coming on, and children looking for something to do, it would be fun to feature a folk toy, hopefully each Friday, redone in a modern, kid-friendly fashion.

The Flipperdinger, in it's original form, uses the Bernoulli principle to move a ball, with a wire through it, up a stream of air, and hook it over a basket ball, or noose type hoop. To see a demonstration, click here.

We made our Flipperdingers out of bendy straws, two pipe cleaners each, a pompom (we tried a couple of different sizes, but liked the 1'' size the best), a bread tie, and a piece of yarn less than a foot long.

First, we bent the bendy straw, to make a pipe.


Then, we connected the two pipe cleaners by overlapping two of their ends, and wrapping them around each other, to make one long pipe cleaner. We made a loop in one end of it, and twirled the other end around our straw, near the bendy end, as shown.


We pushed the bread tie through the middle of the pompom, and hooked one end of it.


Finally we placed it in the bendy end of the straw, so the pipe cleaner hoop was standing over it, and blew through the other end.


Our version doesn't use Bernoulli's principle so much, but a puff of air will make the pompom fly up.


The idea is to hook the bread tie onto the pipe cleaner hoop. It's not impossible, but it is very hard.


To make the game a little easier, I turned the bread tie hook into a loop, and tied a piece of yarn to the loop on one end, and the straw on the other, as shown.


Then, the idea was simply to get the pompom through the hoop, and dangling over the rim.


That's still challenging, but easy enough to be enjoyable even for the younger children.

It's great to be a homeschooler.