
My oldest son is currently going through a huge Doctor Who phase. I was tempted to crochet him a set of amigurumi Doctors for his stocking (I like to toss a few homemade gifts in with the store bought presents, to plump up and personalize the pile), but noting the box full of felt, and crocheted softies, from years past, sweetly saved, but stuffed discretely under his bed, I thought it might be time to try for something slightly more teen-ish.
I decided to use a few of his favorite elements, and characters from the show to create a customized puzzle for him, instead. Thinking of the 9 piece puzzles we've enjoyed in the past, I drew out a grid in the Paint program, using the "ruler view" to measure out even squares.

I copied pictures out of Google images (since this is for a personal gift, rather than for sale, I didn't worry too much about where I copied them from), and added them to my grid sheet. I used the Paint program again to squish my copies down to a size that looked like it would fit into the grid, and to draw straight, guide lines across the middles of each of the pictures.

Then, using the guide lines, the "ruler" and "grid view" to line up the pictures, I copied and pasted them into the grid (tip: the "copy" rectangle needs to be large enough so the picture won't get clipped off when rotated)...

...adjusting the size of each shape, as I added each new picture in, to make sure they would all fit together across the squares...

...and following a pattern of one of the 9 piece puzzles we already have (you can find all kinds of patterns to copy by searching for "9 piece puzzle solution").
Once I had all the pictures in place, I cropped around the outside of the grid...
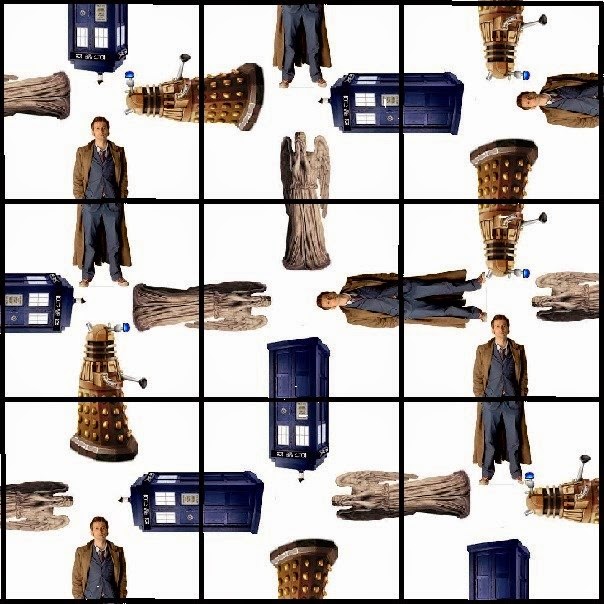
...and printed it out as a 5x7 in. picture (for a small, stocking stuffer sized puzzle), unchecking the "fit to frame" box, so the grid would stay square, instead of being stretched into a rectangle.
I wanted to be able to glue the grid down onto a piece of cereal box cardboard, so I also printed out a Doctor Who modified version of "The Starry Night" to glue onto the backside of the cardboard (the only episode T's been able to talk me into watching with him was one with van Gogh).

I glued the puzzle grid down onto the blank side of the cardboard...

...and covered the printed side with the darker colored "painting".

Then, I covered both sides with clear contact paper...

...before carefully trimming, and cutting apart the squares.

I checked for any loose corners, that needed an extra spot of glue...

...and then double checked to make sure the pieces all lined up nicely, whether they were in the correct order, or not. Cutting by hand this way, it would be impossible to get everything perfect - but as long as the pieces are close, the puzzle will still be difficult to work.

Satisfied with the fit of the pieces, I stacked them up, and tied them with a ribbon...

...ready for Christmas morning.
Once I had the hang of copying and pasting the pictures into the grid, the whole project came together very quickly. And, of course, it could be customized to any theme. In fact, I'm already thinking of making a couple with slightly more complicated patterns to fit in pictures of all the children for both sets of grandparents.


5 comments:
Cool, you are creating some gifts on your own! I believe children can feel the love inside such personal presents.:)
Honesty, you are the most creative mommy I know!
I totally agree with Camie, I love seeing what you are up to because it is always so different and creative! Here's hoping your son doesn't read your blog!
These are great, I am making one for my Dr. Who loving daughter! Thanks!
What a great idea! We've never made homemade puzzles.
Post a Comment