Wednesday, January 11, 2012

Flat Snowmen - For Children With Very Little Snow


We finally did get about an inch of snow, at around midnight last night. It's already melted off, but for a brief bit this morning, it looked like winter.

We rushed out first thing, to take a look of the jumble of tiny snowflakes through our handheld microscopes.


Then, we quickly set to work crossing at least one project off of our winter to-do list. There wasn't quite enough snow to make a proper snowman - at least not in 3D, but by pressing the rim of a plastic bowl into the snow, and with the addition of a few carrot shreds from our salad mix, dirt clods form the garden, and twigs from under trees...


...we could make all the two dimensional snowman we wanted.


At least until around noontime, when the melting started in earnest. Then, we retreated to the house for lunch with hot chocolate, and snow themed audio story.


After I read to the children yesterday, about Snowflake Bentley, A (age 10) remembered that she had read about him already in Megan McDonald's Judy Moody and Stink, The Holly Joliday. By the time she got around to asking me what a stellar dendrite was (Stinks costume in the book), I decided to download the audio story from the library, so we could all listen to it together. It turns out to be much more about snow than about Christmas - making it the perfect addition to any (ever so slight) snow day.

It's great to be a homeschooler.

Tuesday, January 10, 2012

Waiting For Snowflakes - Craft and Cookies


I had hoped to bundle the children up, and send them out with handheld microscopes today, to view snowflakes up close, before reading to them about Wilson Bentley, the man who discovered, that no two snowflakes are alike.

Unfortunately, despite our weatherman's promise of snow, we were met this morning with rain, giving way to a beautiful, and balmy, blue sky covered afternoon. I still sent the younger children out to play, considerably less bundled, and without the microscopes, while the older girls went to work on "plan b", forming six pointed, snowflake designs out of pony beads...


...on a tinfoil covered cookie sheet...


...to melt and fuse together in a 400 degree Fahrenheit oven (it takes about 15 minutes, and smells terrible - with what I can only assume are toxic fumes - I was glad it was warm to throw the windows open).


We had planned on poking holes in the tops of each snowflake for hanging, while they were still hot, but they cooled very quickly, and still looked melted, so we missed the chance. I'm thinking we might try melting them slightly again, so we can add the holes.


But first, we had cookies to bake. I made up a half batch of chocolate sugar cookie dough, and added a few drops of black food coloring, rolled it out, and cut it into squares before baking...


...to serve as a background for Snowflake Bentley inspired, melted white chocolate chip, snowflakes.


They're not as beautiful as Mr. Bentley's pictures of the real thing...


...but they're as close as we could get today.


It's great to be a homeschooler.

Monday, January 9, 2012

Chocolate and Peanut Butter - Fluffernutter Playdough

I made up a quick batch of fluffernutter dough, edible peanut butter and marshmallow playdough, as a snacktivity to go along with our growing peanut plants.


Really, I just had to see for myself, if you can mix two things as sticky, and messy as peanut butter and marshmallow cream, together...


...and end up with a pliable, pleasant playdough. It turns out that you can.


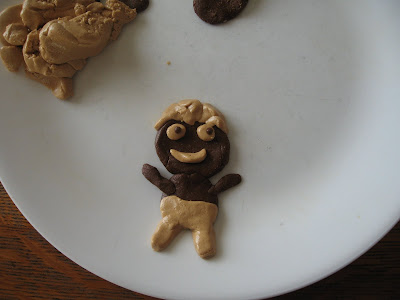
And, when you put it together with chocolate playdough, or tootsie roll dough as we like to call it (a half batch is just right), it's pure snack time, boredom buster, genius.


I was thinking we'd make something educational, like maybe Fibonacci inspired flowers.


The children had other plans, though.


But, I'll get them back, because there's actually a short science lesson to go along with the recipe for the fluffernutter dough at Homeschool Science Tools. If you're interested in playdough science, you might want to check it out, there is also a recipe for adding gelatin to the everyday cream of tartar, cooked playdough recipe. And, for even more science themed, playdough ideas, check out this link courtesy of The Learning Hypothesis.


Oh, and for those of you who want to know, this is what our peanut plants look like, today.


It's great to be a homeschooler.

Sunday, January 8, 2012

Make Your Own Chocolate Kit - Review


Last week, while we were experimenting with our left over Christmas candies, the older girls mentioned they would like to try making chocolate themselves. It wasn't exactly in my plans, as the goal of our chocolate experiments was to use up some of our candy supply, not add to it, but when I saw Glee Gum's Make Your Own Chocolate Kit, and read that it not only comes with all the supplies you need to make 8 oz. of dark chocolate, but also with a couple of cocoa beans to sample, I just couldn't resist.

After watching, The Magic School Bus in the Rain Forest, as well as several from bean to bar type chocolate making documentaries, I was about as curious as the children were to see, smell and taste a real cocoa bean.


I ordered the kit from Amazon, and it arrived just in time for a Friday surprise. I slipped in an audio version of Roald Dahl's Charlie and the Chocolate Factory, and placed the kit on the table, just after breakfast.

The girls were delighted. We unpacked the supplies:

* instructions and a brief history of chocolate
* cocoa powder
* cocoa butter
* confectioners sugar
* chocolate seed crystals (a chopped up candy bar)
* two stick on thermometers
* a number of paper candy liners
* and two and a half cocoa beans.

We made short work of removing the shells from the cocoa beans, releasing a wonderful, deep, chocolaty aroma from the nibs. The taste was about what I had expected, somewhere between an espresso bean and baker's chocolate - enough to drive all but the serious chocolate makers from the kitchen.


The older girls (ages 10 and 12) proceeded from there, pretty much on their own, examining...


...and melting the cocoa butter in the microwave (the bowl got extremely hot)...


...stirring in the cocoa powder and sugar, then returning the chocolate mixture to the microwave for a few more seconds...


...before stirring in a touch of vanilla extract (an optional ingredient not in the kit), and waiting for the temperature of the chocolate to drop to exactly 94 degrees Fahrenheit, before stirring in the seed crystals for proper tempering.


The instructions provided a very good, child friendly explanation of the science behind tempering chocolate. That, really added a nice layer of deeper understanding to the chocolate waterfall passage from the book.

And, Dahl's imagination, along with a little encouragement from the kit instructions, sparked some real creativity in the girls, as they added nuts, marshmallows and peanut butter to their chocolates.


Overall, I was very impressed with the kit, and it's not too often I can say that about "science" kits for children. This one though, provided a history and geography lesson, a good bit of math, and just enough science to make it interesting but not overwhelming.

It didn't hurt either, that the chocolates turned out very good. I wasn't expecting too much. A few of the customer reviews on Amazon mentioned the chocolate turning out inferior, or grainy. Perhaps we hit just the right kind of day, weather-wise, or maybe the girls followed the instructions more closely than the reviewers, but their chocolates were very good - gold ticket good, even. I think even Willie Wonka would have been pleased.


It's great to be a homeschooler.

Linked with Science Sunday at Adventures in Mommydom (a peanut plant update is coming up next).

Saturday, January 7, 2012

Fibonacci For Children - Pony Beads and Pipe Cleaners


I saw a great idea by Susan Caplan over at Suite101, that went perfectly with our reading to the week...


...using pony beads and pipe cleaners to allow younger children to explore the Fibonacci sequence.

I added a simple, cereal and pipe cleaner counting frame...


...that we had made earlier in the week, following instructions from the back of Virginia Walton Pilegard's The Warlord's Beads, the second book from her math-themed series too, because an abacus plays heavily in the illustrations of Joseph D'Agnese's BLOCKHEAD, the Life of Fibonacci...


...and, because it proved very useful for adding up the numbers in Fibonacci's sequence, for counting out beads, and for keeping track of which number in the sequence we were on.

First though, we sorted the pony beads by color, to get us into a mathematical mood, and to bring some order to the chaos, before we started arranging the colored beads according to the pattern of the sequence.


I folded one end of a pipe cleaner back for each girl, so the beads wouldn't fall off as they threaded on a different color for each number in the sequence. When they reached the end of a pipe cleaner, we twisted on another, and continued on.


After a while, we decided to bend the pipe cleaners at the junctions between numbers, so the girls could see the ever widening spiral they were forming.


By the time we had to stop, I had reached 233 in the number sequence, E (age 7) was only one step behind me at 144, and C (age 5) was just one step behind her at 89 beads.


At which point, although we weren't completely out of beads, we were running low on work space.


It's great to be a homeschooler.

Linked to:

What My Child is Reading at Mouse Grows Mouse Learns


and

Math Monday at Love2Learn2Day.