Thursday, November 4, 2010

Turkey Bean Bag


Ready for a game of turkey toss?


Well, first you're going to need a turkey bean bag.


Start by cutting the pieces out of felt. You'll need two circles (roughly large mug sized) for the body, two feet pieces, two wing pieces, two eye pieces, two pupil pieces, two half circle eye lids, so your turkey will have that relaxed "I really don't care" kind of attitude, one small triangle for the beak, one tear drop shaped snood, and two tail feather pieces, one shorter than the other, and both the diameter of the circles, at the bottom.

Sew these pieces together, as shown. If you have some good fusible iron on stuff, or fabric glue, that might work, too.


Then, sandwiching the leg, and feather pieces between the circles, sew the two circles together...


...leaving a hole for stuffing with dried beans. This is not a toy for babies, or toddlers, who might rip it open, and choke on the filling.


Finish sewing it up. You might want to stitch around a couple of times to reinforce the seams, and your ready to play. Now all you need is a bucket.


Of course, if you don't have a bucket, it's also good for playing turkey in the middle, with your little brother.


Or, for throwing at the lady with the camera.


It's great to be a homeschooler.

Newspaper Wigwam


Okay, just for the record, this is not at all the proper way to build a wigwam. But, it is a good way to engage your children in a discussion of how they are built (and who lived in them). Here's a link to a cute, animated video instruction. And, here's one for instructions on building a scaled down model, for school aged children.

We, however, wanted something bigger. And, lacking young saplings, or tree bark, opted for newspaper, as a building material. The children glued five sheets of newspaper together, end to end.


Then, they rolled the sheets vertically, to make long tubes.


They used two of the tubes, stapled together to form a circular base.

Two more tubes were stapled across, east to west, to form a double arch, with space between for a door.

Then, three (though we had intended four), were arched across, and stapled, from north to south. The tubes were stapled to the base, and to each other where they crossed.


Much to my surprise, the structure stood. It was lopsided, but it stayed standing, even with a wiggly four year old, going in, and out.

It was not strong enough to support a cover though, so we propped it up before taping newspaper sheets to the outside.

We only had three newspapers to begin with, so we ran out, when our wigwam was about 1/3 covered, but it gave the children the idea.

We also talked about how the natives might have covered the door, and why a hole, to let the smoke out, would be necessary in the roof. Since we mainly have examples of tipis, in this part of the country, I wanted to give the children a hands on, visual demonstration of the type of homes the Wampanoag people, encountered by the Pilgrims, would have lived in.


Mission accomplished.

It's great to be a homeschooler.

Wednesday, November 3, 2010

Candy Corn Turkey Craft

Tomorrow, it will have been a year exactly, since we read Teresa Bateman's Plump and Purky Turkey for stART (a story + ART link-up, at A Mommy's Adventures), and made candy corn, turkey cookies.

We made another batch this year...


...and they inspired, the turkey craft below, reusing our tissue, and contact paper, candy corn, from our windows.


I traced a circle, on cut open lunch bag, for the girls to cut. Or rather, for E (age 5) to cut. I cut the circle out for C (age 4).


They glued on google eyes, and drew beaks, and feet (and eventually snoods), with markers.


Then, they glued on the candy corn, which I had carefully removed from the windows. C, chose to glue hers, on the front of the circle.


E, glued hers on the back.


Finally, once they were dry, we taped them back onto the windows. For a new, seasonally appropriate, display.


For more story stretching arts, and crafts, check out this week's stART link-up, at A Mommy's Adventures.

It's great to be a homeschooler.


Tuesday, November 2, 2010

Plymouth Rock Cookies


Plymouth Rock Cookies

3/4 cup butter, softened
1 cup powdered sugar
1 teaspoon vanilla extract
1 teaspoon almond extract
2 and 1/4 cups of flour
1/4 teaspoon of salt


Mix all the ingredients, until the dough sticks together.
Form into roughly, Plymouth rock shaped (1 to 1 1/2 inch) balls. This recipe makes about 8 cookies. The actual picture of Plymouth rock, at the top of this post, is from Wikipedia, but Google images is loaded with photos of the rock, from all different angles, to use as a guide.


Use a toothpick to "engrave" each cookie with the date - 1620.

Most photos show a rectangle around the date, so I added one by pressing the handle from a lemon zester (or maybe it's a spice grater), into the dough.


Bake on a greased cookie sheet for 7 to 8 minutes, at 375 degrees Fahrenheit, until they begin to brown.

Remove from the oven, and cool completely.

Drizzle with a thin, gray tinted, powdered sugar, and milk glaze. Start with 1/4 cup of powdered sugar, 1 tablespoon of milk, 1 drop of black food coloring, and one drop of green. Then adjust, adding more milk, or sugar, until you have a nice drizzling consistency.


Allow the cookies to sit for an hour, or so, until the glaze has hardened.


Don't worry if they're not perfect. After all, there's a good deal of doubt, that the Pilgrims even landed there, despite what we learned from School House Rock (click here, to view the song on YouTube).

I'd suggest checking out American Beginnings: The Truth About Plymouth Rock with Rick Shenkman, instead (click here, to view it on How Stuff Works).

For more fun with geography, or history, check out this week's Geography, and History link-up at Children Grow, Children Explore, Children Learn.

It's great to be a homeschooler.

Crochet Pilgrim Finger Puppet Pattern


Well, as promised, here is the crochet pattern for the pilgrim finger puppet, I made this weekend.
I'm not really a pattern writer, so you might have to use your imagination some. Still, if you're interested in crocheting a pilgrim finger puppet, this will get you started.


Puppet:

Chain 2, with a cream colored yarn.
Rnd 1: Work 4 single stitch(sc), in first chain(ch). Do not join the rounds.
Rnd 2: 2 sc in each sc around - 8 sc.
Rnd 3: *2 sc in next sc, sc in next sc; repeat from * around - 12 sc.
Rnd 4: *2 sc in next sc, sc in each of the next 2 sc; repeat from * around - 16 sc.
Rnds 5-7: Sc in each sc around.
Rnd 8: *Sc two together(2tog), sc in each of the next 2 sc, rep from * around - 12 sc.
Rnd 9: *Sc 2tog, sc in the next sc, rep from * around - 8 sc.
Embroider eyes, mouth onto face (with single stitches of black yarn, and two stitches of red).
Change to black yarn.
Rnds 10-15: Sc in each sc around.
Fasten off.

Ears (make 2):

Ch 3, with cream colored yarn.
Slip st through the first ch.
Fasten off, and sew to the side of the puppet head.

Arms (Make 2):

Ch 4, with black yarn.
Starting in second ch from the hook, sc in each ch.
Fold vertically, and slip st the through last stitch and the ch to fold the arm vertically, making it like a cord.
Hook through some white yarn, and sc a couple of stitches onto the end of the arm to make a ball like hand. (I'm sorry if this isn't terribly clear - it only takes a tiny bit of white at the end of the arms, and I just muddled my way through it.)
Sew arms to the side of the puppet.

Collar:

Ch 19, in white. (Depending on your gage, you might need fewer, or more stitches. You need it long enough to wrap around the puppet's neck).
Starting at the second st from the hook, st in every ch.
Fasten off with a long tail.
Use the tail to sew the top edge of the collar around the puppets neck, bringing the two ends together, but not connected, in front.

Hat:

Ch 2 in black.
Rnd 1: Work 4 sc into the first ch.
Rnd 2: 2 sc in each sc - 8 sc.
Rnd 3: In back loops only, 1 sc in each sc - 8sc.
Rnd 4: In both loops, 1 sc in each sc.
Rnd 5: In front loops only, 1 sc in each sc.
Rnd 6: In both loops again, *2 sc in next sc, sc in next sc, repeat from * around - 12 sc.
Rnd 7: *2 sc in next sc, sc in each of the next 2 scs, repeat from * around - 16 sc.
Rnd 8: *2 sc in next sc, sc in each of the next 3 scs, repeat from * around - 20 sc.
Fasten off. Weave in loose end.

Ch 10, or how many it takes to fit as a belt around the hat. Sew it on around the hat, with the loose end, and sew on four stitches of grey, or gold yarn for the buckle.

Sew the hat to the puppet's head.
If you have any questions about this pattern, I will try to answer them. But, as time passes, I will totally forget everything - and then, your guess will be as good as mine.
It's great to be a homeshooler.

Monday, November 1, 2010

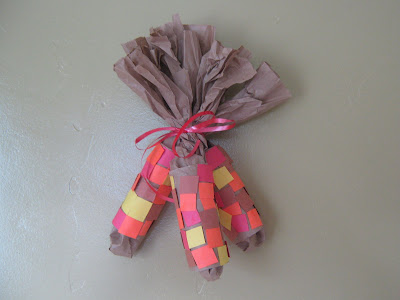
Toilet Paper Tube Indian, or Harvest Corn Napkin Rings, and Decorations.

After seeing the pretty Thanksgiving corn craft, on Ramblings of a Crazy Woman (via One Pretty Thing), and since I already had the construction paper out, I decided to do one more quick, Indian/harvest corn craft, with the girls.

I had them cut strips of brown, yellow, red, and orange construction paper into squares. C (age 4), was especially fond of this step.

Then, they glued their paper kernels onto empty toilet paper rolls.

The younger girls were a good deal more haphazard in their kernel placement, than their older sisters - but the copious amount of glue they used, held everything in place.


When they were dry, or at least mostly dry, I stuffed some lunch size paper bags, through them. Recycled, brown, packing paper would be even better.


Then, I ripped, and twisted the tops, to suggest dried husks...


...tied them together with ribbons...


...and hung them up.


I didn't glue the paper bags to the toilet paper tubes, they're just held in place by friction, because I want to be able to easily remove them, so on Thanksgiving Day, they can double as napkin rings.


It's great to be a homeschooler.

Indian, or Harvest Corn, Paper Weaving Craft For Children

Thanksgiving time just begs for a children's, paper weaving, craft. But, taking on an entire place mat's worth of weaving construction paper, can be a bit much for younger children.

I decided to start mine off with a smaller, cob of corn, sized project for a warm-up.

It's pretty simple. Cut a roughly corn shaped piece out of brown construction paper.

Fold it, and cut vertical slits, leaving about 1/4 inch from the edge, intact.


Give it to your child, with thin strips of construction paper, in orange, red, and yellow, and let the weaving begin.


When they are done, have them glue down the loose ends, to the brown piece.

Then, trim off the extra, around the edges.
Depending on how corn shaped your original piece was, you will either have a lovely, cob of colorful corn, or a fall colored Easter egg.

The nice thing about harvest, or Indian corn is that even if the children make a mistake, and forget to alternate a strip, it only adds to the random kernel effect.

It's great to be homeschooler.