Thursday, March 4, 2010

How To Make An Apple Pie (And See Your State)

We picked up Marjorie Priceman's How to Make an Apple Pie and See the World from the library this week (thanks to Ticia at Adventures in Mommydom for recommending it).


The story follows a little girl around the world, as she gathers the ingredients to make an apple pie, after finding her local market closed. The children enjoyed tracing the girl's travels on the map, included in the book, but they didn't think we'd need to travel quite so far to find the same ingredients. After all, the little girl in the story went to France to get an egg laying chicken, and we had to wait while one crossed the road, in front of our van, last Sunday on our way to church.

I printed out a Montana Product Map, from Montana for Kids, and we quickly located most of the other ingredients we would need. Our sugar would come from the sugar beets in eastern Montana, where there is also a good supply of wheat - eastern Montana is part of the bread basket of the country. Dairy farms are located all across the state, one very near to us, and as I already mentioned, finding eggs nearby would not be a problem.

Salt, and Cinnamon would be difficult to find in Montana. But, we might be able to do without those.

As for apples...


My youngest son has been carrying an apple seed, left over from his lunch, in his pocket, for a couple of days. It seemed like a good time to plant it.

And, just so there would be no confusion - my oldest daughter sketched out, and colored, a Made In Montana label for it.


There is a recipe for apple pie at the back of the book, too. But, I think it might be a while before we have enough apples to make one.

For more fun with geography, visit the Geography and History link up at Children Grow, Children Explore, Children Learn.

Or, for more story stretching arts and crafts projects, click over to this week's stART (story+ART) link up, at A Mommy's Adventures.

It's great to be a homeschooler.

Wednesday, March 3, 2010

Fun and Fruity Rainbow Cookies

I decided to make one more batch of rainbows for the children, tonight - cookies this time.


I started out with a plain batch of sugar cookie dough, but I didn't add any vanilla, or flavoring, until after I divided it into six bowls. It didn't seem right to serve up colorful - vanilla - cookies, so after I added a few drops of food coloring to each bowl, I started searching through the kitchen for something to flavor the colored dough with. Ideally, a little bit of powdered Kool-Aid, matching each color, would have been nice, but I didn't have any on hand, so I had to improvise:

  • For purple - A couple of teaspoons of double strong blueberry tea. I brewed a cup with two tea bags, and then drank what remained after I took out the teaspoons for the dough.

  • Blue - One teaspoon of vanilla. I didn't have a good blue flavor, so I figured one layer of vanilla would be alright.

  • Green - One drop of peppermint extract.

  • Yellow - One teaspoon of lemon juice.

  • Orange - Two teaspoons of powdered Tang :)

  • Red - One teaspoon of strawberry extract.

Looking at it now, it seems like an odd combination of flavors, but they ended up working nicely together, and the cookies turned out lightly fruity, and very spring-like.

I had to add a little extra flour, to stiffen up the dough after the food colors, and flavorings were added. Then I rolled each color, except the purple, out into a small rectangle, and stacked them on top of each other, first red, then orange, yellow, green, and blue. Finally, I rolled the purple into a thick rope, and placed it on top in the middle.


I wrapped the layers of dough around the purple middle, realizing in the process, that I should have made the bottom red, and orange layers wider.


I wrapped the dough in wax paper, and put it in the refrigerator to firm up for about an hour.


Then, I sliced the dough into about 1/4 inch thick slices, cut the slices in half to make rainbows...


...and baked them at 350 degrees Fahrenheit for 10 minutes.


It's great to be a homeschooler.

There's Iron In Our Cereal, or Success At Last!

We finally managed to pull the tiny bits of iron out of our Rice Krispies!

For those of you who are coming in late, and don't know what I'm talking about, you can click back to our last Science Sunday post, when we started out trying, and failing, at an experiment inspired by Vickie Cobb -from her book We Dare You! Hundreds of Fun Science Bets, Challenges, and Experiments You Can Do At Home.


I have to say, we've had pretty poor luck carrying out most of the experiments from the book, which is sad, because they all look like great fun. I was just about to give up on Cobb altogether, when I saw a very similar experiment, for pulling iron out of cereal, in another book from the library.

This time, following Mike O'Hare's instruction, we ground our Rice Krispies in the blender, with hot water. It made for an interestingly repulsive, and foul smelling glop, but even using our strongest magnet, we were not able to pull any iron out of it.

We hypothesised, that perhaps our magnet wasn't strong enough to pull the iron out through the goop. But, after testing the magnet, with a washer, we decided that was not our problem. And, in case you were wondering, we used a magnet wand, that came with our Klutz Exporabook (you can find it at http://www.klutz.com/, or possibly for less at Amazon).


Then, we thought maybe we'd left the iron behind in the blender. We tried an alternate method of crushing up the cereal, mixing it with water in a baggie, and then passing the magnet by the bottom of the bag. But, we still didn't see any iron.

Our next thought was, that the problem was with the cereal we were using. We chose Rice Krispies, because it had the highest level of iron per serving, out of all the cereals in our cupboard. My son, being a good Montanan, decided it was some sort of government conspiracy, and there is not iron in cereal at all. I decided to try Fruit Loops.

At first, we returned to the Vikki Cobb method, of crushing the cereal, and putting the magnet right into it. The magnet came out covered in cereal dust, but nothing that looked black, or seemed particularly metallic.

Finally, I decided the to spread the crushed cereal out flat on the paper, and pass the magnet slowly over the top of it - and success! As the magnet passed over the cereal, tiny particles jumped up, and attached to it. It worked equally well for the Rice Krispies, and the Froot Loops.

And, what we discovered, is that the bits of iron are so tiny, we weren't separating them from the cereal, so they appeared to be regular cereal crumbs. However, the nonmetallic crumbs stayed on the paper, while the ones with tiny pieces of iron in them jumped up to our magnet.


It's good to be a homeschooler.

Tuesday, March 2, 2010

Rainbow Promises - A Family Craft

My husband and I, our pretty typical parents when it comes to promise keeping. We always have the best of intentions, and want to give good examples of integrity to our children, but we are forgetful.

And, our children are pretty typical children when it comes to promises. Every statement, no matter what sort of phrase it begins with, such as maybe, perhaps, or possibly, is taken as a solemn vow.

Naturally, this has led to some frustration, and confusion in our house, but we modified a craft found in our Hands on Bible, in a way, that I think might help us all. The original craft was meant to go along with the origin of the rainbow, as a reminder of a promise, in Genesis 9. The children were supposed to add raindrops to a rainbow, with promises they'd made to God, written on them, so they would be reminded of them, whenever they looked at it.


We hung strings with paper clips, to our rainbow, so we could add, and remove raindrops from them. And, instead of promises to God, which quite frankly I'm a little leery of, we will write our promises to the children on them.

So the children will know if it's not written on a raindrop, it's not really a promise. And, we will have a reminder of our promises. When the promises our fulfilled, they can be dated, and moved to the back of the paperclips. Then later, the children will have a reminder that we do keep our promises.

It's great to be a homeschooler.

A Couple of Dr Seuss Links to Mark His Birthday


Okay, if you're just waking up, and realizing it's Theodor Geisel's, or Dr. Seuss's birthday, and feeling like a bad parent/educator, because you didn't plan anything for your children on a day that celebrates reading - don't panic. And, don't bother rushing out to the library, to pick up a Dr. Seuss book either, they're all checked out by now, and while your library might be having some sort of Seuss event, it will inevitably be crowded and chaotic.

There's a much simpler solution right on your computer. YouTube has a days worth of Seuss videos (I know, I know, videos!?! But the author had a hand in them, and his artwork, and style are displayed in them, just as well as the books - you can always do a reading exercise too, if it makes you feel better). Some are in the old Grinch style, like The Sneetches, which you can find in two parts, here and here . For an easy companion snack, frost cookies, or cupcakes, with yellow frosting, adding a blue frosting star to a few.

Or, there are also videos from the newer Beginner Book Series, like Dr. Seuss's ABC. Add some alphabet soup, and an alphabet coloring page, and you've got your own homemade Dr. Seuss event.

Of course, before you buy into all the hype, you might want to check out the History Channel's biography of the author. You can find it on YouTube, too, in 9 parts, that I linked below. But, I wouldn't suggest watching it with your children. His life, and total body of work, are not quite as child friendly as Green Eggs And Ham. It's really a sad, sad story.
The links below, worked on, and off for me when I was testing them - so if they don't work once, you might try them again, the worst they'll do is take you to YouTube's main page, but be assured, there is a History Channel biography of Theodor Geisel, out there.


It's great to be a homeschooler.

Monday, March 1, 2010

Rainbow Slushies A Taste of Spring


March has come in like a lamb in our part of Montana. With St. Patrick's Day, and Easter just around the corner, spring is in the air. And, thanks to an idea from Tina Houser's More Than Cookies & Punch, rainbows our in our cups.


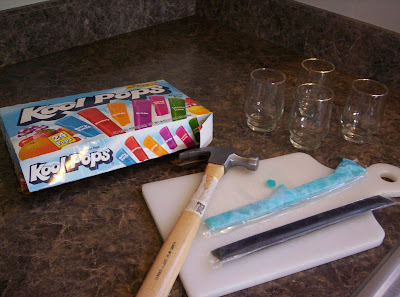
Houser suggests freezing colorful sports drinks in ice cube trays, and then crushing the ice, with a blender, before putting it into cups. We used freezer pops, and a hammer, but it worked pretty much the same.


It took one freezer pop per layer, for two juice size glasses. We found letting them thaw a few seconds, before hammering them, kept the packages from bursting open.

A juice glass full was plenty of sugar, I wouldn't suggest going any bigger. I think if we try this again, I'll see if we can't come up with a juice alternative.
But, the kids were thrilled with their treats, and we counteracted the sugar with a salad lunch. Plus, with the beautiful weather they can run the rest off - outside.

It's great to be a homeschooler.

Magnetic Fishing - More Fun With Magnets

The kids were still playing with the magnets this morning, when they discovered, that magnets attract iron through water, as well as through air.


Their new fishing game was an instant hit.

And yes, just in case you're observant, they were still wearing their pajamas at 9:30 this morning.

It's great to be a homeschooler.