Showing posts with label homemade games. Show all posts

Thursday, February 24, 2011

Toilet Paper Tube Tinker-Like Toys


I mentioned in an earlier post, that we've moved back one book, in our family reading of Blue Balliett's art based mystery series for children.

The Wright 3, centers around Frank Lloyd Wright, and more specifically the Robie House, in Chicago's Hyde Park neighborhood. We've spent quite a bit of time walking past it, and around the area, on Google Maps. I think I've mentioned before too, how much I love the "street view" feature on Google Maps. It's just great for virtual field trips.

We've also been learning about the architect from a number of sources (more on these later)...


...but I will warn you, if you're studying Frank Lloyd Wright with children, proceed with caution. He was not at all a moral individual, and his life was touched by some very violent tragedy.

Also, you might want to have some building toys ready for your children to experiment with, after reading about his architectural career. The Froebel Gifts (or building toys), that he held dear as child, would be fun to have around, but they are quite expensive, as far as wood blocks, and colored paper go.

I found an alternative, in the recycle bin.


Using a hole punch, I made holes all the way around both ends, of a number of empty toilet paper tubes.


Then, I enlarged the holes, by pushing a sharpened pencil through them, until they were big enough to easily fit unsharpened pencils through.


Straws, or wood dowels, or even rolled up tubes made from scrap paper would work equally well, we just happen to have a large number of unsharpened pencils handy.

I also took some of the tubes, and made four slits into the bottom end, and holes on the top...


...just to mix things up a little.


It's great to be a homeschooler.

Monday, February 21, 2011

Combating Cabin Fever With Indoor Games


We had some fun this afternoon, with a game I found suggested in Veronika Alice Gunter's The Ultimate Indoor Game Book. With 200 in-the-house, boredom busting games, it's a great resource for warding off cabin fever.


Our game of choice today, was cup racing.

The set up was pretty simple. I poked holes in the bottom of two plastic cups, with a pencil...


...threaded a long piece of string through each cup...


...and tied the ends to a couple of chairs, placed back to back, across the room from each other.


The children blew in the cups, to make them move.


The first one to reach the opposite chair, with their cup, was the winner.


It's great to be a homeschooler.

Wednesday, December 29, 2010

Cardboard Box Nerf Target

The children received quite a few Nerf guns for Christmas. Needless to say, the Nerf darts have been flying fast and free, since then. Tired of ducking, and weaving through the halls, I decided it was a good day to work on a project with T.

I got a pretty big kick out of it, when one of T's friends called, and he told him, "I'm right in the middle of a craft with my mom, and I really want to see how it works out. Can I call you back?" Big Mom grin :)

Project supplies:

  • a large cardboard box (we had a number of great boxes arrive at the house the week before Christmas)
  • a wood dowel, 1 foot long
  • a drinking straw (a little wider in diameter than the dowel)
  • scissors
  • tape
  • and markers.

We started by cutting a rectangle about 10 inches wide (so, the opening was narrower than our dowel), in one side of the box.


We used a bowl, to trace out a barbell like target, on the cutout piece.


Which, we colored, quickly, with markers.


Then, we cut a small piece of straw, and slipped it over the dowel. Before we hung the dowel across the opening in the box, we added two pieces of tape on either side of the straw, to keep it centered.


We taped our target to the dowel. We started taping it in the center of the target, but realized after we taped the dowel across the opening in the box...


...that we had to adjust it, so it would hang down lower on the bottom, to make it bottom heavy, so it would hang vertically, instead of balancing horizontally. It proved to be a good science, and math lesson, as we not only had to adjust the balance of the target, but also cut the hole bigger, to allow the target to spin freely, without hitting the box.


I'm sure the Man of the House will have some modifications to make, when he gets home, but for now, at least I can walk through the house without donning a hard hat, and safety goggles.


It's great to be a homeschooler.

Friday, December 3, 2010

Clothespin Button Racer


For a easy boredom buster, gather together:


  • 1 clothespin (per car)
  • 4 buttons, of the same size
  • 1 drinking straw
  • 2 bread ties
  • colored tape
  • school glue (optional).

Cut two, one inch, pieces from the straw.


Thread the bread ties through the straws, and secure a button on each side, either looping the bread tie through the back hook, or the holes, depending on the type of buttons you have.


Clip one of the straw axles in the front of the clothespin. You can glue it in place, but that isn't necessary.


Slide the other straw axle into the back of the clothespin, up against the spring.


Secure it in place with a piece of tape, as shown.


Make more than one...


...and let the racing begin.


If you don't have a large piece of poster board, you can make a pretty good racing ramp out of an empty cereal box, too.

I found the idea for this toy, in Mary Wallace's excellent, for-kids, toy making book, I Can Make Toys. It's one of those books, where almost every idea looks like fun, and can actually be done by children, on their own.

It's great to be a homeschooler.

Thursday, November 18, 2010

Cranberry Tinted Play Dough

We had a few cranberries left over, after our last batch of bread, and I decided to put them to a less fattening, holiday use, by making up a batch of dye for play dough.

I poured three cups of boiling water over about 1/4 cup of berries, and let them steep, until the the water cooled.

Then, just for good measure, I popped them in the microwave for five minutes, and let them sit on the counter until cool, and in the refrigerator, overnight.


This morning, I strained off the berries, and used 2 cups of the tinted water to make up a batch of very pretty, cranberry pink, play dough, following our usual, stove top, recipe.

  • 2 cups of flour
  • 1 cup of salt
  • 4 tablespoons of cream of tarter
  • 2 cups of water
  • a few drops of food coloring (which we omitted this time).

Cook, stirring constantly, in a medium pan, over low heat, until thick, and rubbery. Remove from the pan, and knead, as the dough cools, until smooth. Store in an airtight container. Usually this recipe keeps for several months. I'm not sure how the natural dye will effect that, though I'm pretty confident it will last through Thanksgiving.

It's great to be a homeschooler.

Tuesday, November 16, 2010

The Bowl Game - Thanksgiving Games

Another game played by the Wampanoag, around the time of the first Thanksgiving (according to the Plymouth Plantation site), was the "bowl game", or "hubbub".

Small, flat, marked pieces were bounced in a wooden bowl (we used plastic). Some sites claim the Native People used plum stones for this game. We used 10 pumpkin seeds, marked on one side with a blue marker. But, Phyllis at All Things Beautiful suggested using Lima beans, which I think would work even better.

For our play, each team was assigned dots, or plain.


The bowl was bounced against the floor, while all players chanted "hub, hub, hub".


When, the bouncing stopped, the number of plain, or dotted sides, were counted, and points tallied for each team.


Score was kept, and play continued until one of the teams reached 50 points.

This is probably not exactly the way it would have been played, if it was played, at the first Thanksgiving, but it was close enough for our purposes.

Speaking of the first Thanksgiving, we were alerted by Live The Adventure, this morning, of Scholastic's virtual field trip, to the Plymouth Plantation, at 1:00 PM Eastern Time, today. Click, here, to check it out, or sign up for the free Webcast.

If you read this later than the webcast, I understand it will be available for replay, here.

It's great to be a homeschooler.

Friday, November 12, 2010

Milk Ring And Pin - A Thanksgiving Game

Ring and Pin is a simple, hand eye coordination game, that has been played for hundreds of years by Native Americans, and would have been familiar to the Wampanoag people, encountered by the Pilgrims.

The form, and rules, vary some from tribe to tribe. But, it is generally made up of a sharp stick, or bone needle, attached to a length of string, with a loop at the opposite end, and strung with hollow deer bones.

The idea is to hold the stick, flip the rope up into the air, trying to catch as many bones as possible, through their holes, with the stick, on the way down. Usually, you get one point for each bone you catch on the stick, with extra points given if you catch the bone closest to the stick.

I thought it might be fun to make our own version of the game. We didn't have any deer bones available...okay, we actually do deer bones available, this is hunting season in Montana, after all, but ewww! However, it seems to me, the idea is to use what you have available, that you might otherwise throw away. So, we went with what we had on hand in the house - a craft stick, a piece of twine (14 inches long), and 11 milk jug rings.


We tied one end of the string to the craft stick, threaded on 8 milk rings, and tied the last three to the loose end of the string, flailing them out, to keep the other rings from slipping off.

Since, we have one green ring, at the end, we assigned 5 points to it, and 1 point to all the others. It takes a few tosses to get the hang of the game, but it's quite addictive, and has really brought out the competitive spirit in the children.


If the Wampanoag people whooped, and hollered as much as my children, while playing the game, the Pilgrims might have thought they were savages - I'm pretty sure we have some neighbors, who would agree.


It's great to be a homeschooler.

Monday, August 2, 2010

Pre-Chess for Kids, Playing With Pawns


We played a pre-chess sort of game today, to learn how pawns move, in the game of chess, improving our math skills at the same time. Click, here, to read an article from About.com, detailing the link between the two.


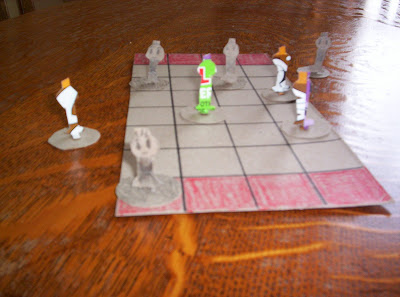
The game, which we made out of cereal box cardboard, is our version of one from Learn to Play Chess With Fritz and Chesster - a computer game teaching chess through a series of games, that look nothing like chess.


The children pulled it out, and started playing it again, after I checked out Harvey Kidder's The Kids' Book of Chess, recommended by All Things Beautiful (they ended up playing a pre-chess game involving pawns, and the king, which you might want to check out, too).


We started by making a game board, divided into 32, one inch, squares - 4 across, and 8 down. We colored the four squares on each end, to make finish lines.


Each player has four pawns. I was going to use our chess pawns, but my oldest daughter wanted to make her own, to look more like the ones from Fritz and Chesster, and I wasn't about to object to a spontaneous craft project.


The pawns are lined up facing each other, on the rows in front of the finish lines.


Players take turns moving their pawns forward, one square at a time.


The first time a pawn is moved, it can be moved forward two squares, but after that, only one square at a time, again.


Pawns always move straight forward, except to attack another pawn, and then they move forward, one square, diagonally, knocking the opponents pawn off the board.


The first person to get one of their pawns across the opposite finish line wins.


Oh, and in case you are near to the finish line, and your opponent moves two spaces forward, you can knock him off the board by moving into the space he would have occupied if he had only moved one square forward. This is called "en passant".


For more fun with math, and math related games for children, check out Joyful Learner's Math Monday link-up.

It's great to be a homeschooler.