Tuesday, September 30, 2014
Crispy, Crunchy, Pumpkin Pie Rice Krispies
I had an epiphany last night after posting about our chewy, but delicious, pumpkin Rice Krispie treats. I got to thinking, that if you can remove the moisture from pumpkin seeds by roasting them in the oven, on a low heat - why not try the same thing with our overly moist Rice Krispies?
I crumbled the bars up, and spread them out flat on an ungreased cookie sheet. Then, I placed the cookie sheet into the oven, at 250°F for about 10 minutes longer than it took the oven to preheat, stirring them once midway through, and keeping a close eye on them to make sure they didn't start to burn.
I allowed them to cool completely in the oven, before scooping them into a snack bowl for sampling. The result was a pumpkin pie flavored crunch somewhere between the texture of granola and the original Rice Krispie cereal (by the way Kellogg's people, pumpkin pie Rice Krispies is a concept worth looking into).
I really didn't know whether to pour milk over it, and eat it for breakfast, mix in cranberries and peanuts for an afternoon snack, or crumble it over a bowl of ice cream after dinner for dessert. Fortunately, the children liked it well enough to munch down the entire bowl, as it was, saving me from pumpkin pie loving self.
Monday, September 29, 2014
Pumpkin Rice Krispie Treats
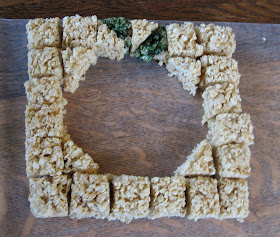
Okay, so I think it was pretty obvious from the picture yesterday, that we pieced our pumpkin puzzle together out of plain old Rice Krispie Treats - the outer edges of the puzzle, anyway.
They were made using the standard, back of the box recipe, with the only change being, that once we had pressed them down into a greased, 8''x8'' pan, we cut out a 1.5'' square, and rolled it in green food coloring, before returning it to the pan.
Then, we turned the treats out onto a sheet of wax paper, and cut them into 1.5" squares, ready to be cut in half diagonally, or pieced as they were into the outline of our pumpkin.
BUT, the inside, pumpkin pieces were made out of Pumpkin Rice Krispie treats. We were inspired by an original recipe from Sally's Baking Addiction. It had stove top instructions, and quite a few ingredients, that we pared down to -
- 3 tablespoons of butter
- 1/4 cup pumpkin puree
- 4 cups of mini marshmallows
- and 1 teaspoon of pumpkin pie spice...
...melted together in the microwave for 1 minute and 30 seconds, stirring after every 30 seconds until all the marshmallows were melted.
Per a tip from Sally, we let the melted marshmallow goo sit for 30 minutes, to cool to room temperature, before adding 6 cups of Rice Krispies.
Then, we pressed the treats into our now empty, but still greased, 8''x8'' pan, to cool, before being cut into squares, and triangles to fill in the center of our puzzle.
Despite allowing the goo to cool, we still found the treats a little chewy, if not exactly soggy. We tend to like our Krispie Treats on the dry side, and so weren't "in love" with the texture. The look, smell, and taste nearly make up for the chewiness, though. They really are a pumpkin pie lover's delight.
For now, they're going into our just-a-little-more-tinkering-and-it-will-be-perfect file, to save for another day, when we don't have the remains of two batches worth of Rice Krispie Treats in the middle of our table.
Sunday, September 28, 2014
Fall Themed Half-Square Quilt Puzzle Blocks
We had a cold rainy weekend, perfect for staying inside, and working on puzzles. I pulled out the card-stock, half square, quilt puzzle set, I made for the children over the summer, and copied off a few fall themed, quilt blocks for the children to try to piece together, this time.
Just in case you can't tell from my beautiful sketches above, they are supposed to be leaves, pumpkins, sunflowers, candy corn, and bats (inspired or copied from actual quilt patterns).
Sadly, our puzzle set doesn't include any orange triangles, and we didn't have a scrap of orange card-stock on hand, so we had to get creative when it came to the pumpkin quilt block (and the candy corn, but that's a problem for another day). As for the pumpkin...
...come back tomorrow, and I'll tell you what we came up with - most likely. Or, you can just look at the picture, and give it your best guess, and then come back tomorrow anyway, to find out why it's special.
Friday, September 26, 2014
Poppin Cookin' - Fun With Japanese
Several of the girls' favorite Youtubers have posted Popin Cookin' tutorials, and the girls have been very keen to give the Japanese candy mixes a try. I noticed the kits weren't very expensive (in the $3.00 to $5.00 range) on Amazon, and ordered a bunch as a look-what-you-get-to-do-once-we-get-moved-in kind of incentive to lessen the bitterness of moving.
The kits come with everything you need to make tiny treats. All you have to do is add water, and pop a few of them into the microwave, and just like that, you have adorable little cakes and candies. The catch being, that all of the instructions are in Japanese.
Of course, as I mentioned, there are a number of video tutorials in English, that you can follow along with, if like us, you don't know any Japanese.
On the other hand, the colorful boxes can also provide a fun inducement to learn a little of the language.
I printed off Hiragana and Katakana (Japanese "alphabet") charts, so the girls could write down the English alphabet, phonetic spelling of each symbol, basically translating the words into romaji, the Romanized version of the Japanese spelling.
Then, they were able to type the English letters, or romaji words, into a Japanese/English translator online...
...to cherry pick a few of the easy, or often repeated words from the instructions. It was more like code breaking than translating, but by the time the girls were done, they were becoming fairly familiar with the symbols and sounds of the Katakana and Hiragana "alphabets", had learned a few simple words...
...and had a good time creating tiny, tasty (or at least tasty looking) treats...
...as a reward for all their hard work. Whether miniature ice cream cones, and frosting filled tarts will really lessen their sadness over leaving friends behind, or not, remains to be seen. Now, at least they have something to email home about.
Thursday, September 25, 2014
Fall Crayon Color Matching - Sunflowers
After coloring our crayon transfer sheets with fall colored crayons, we got to wondering if the the colors we chose - red, brown, yellow, and orange were really the best colors to represent fall, at all.
To find out, we grabbed our largest box of crayons (one with multiple shades of each color), and headed outside to see if any of our crayons actually matched up to the natural colors of fall.
Right away, E (age 9) spotted a bunch of tiny, wild sunflowers growing in a nearby vacant lot.
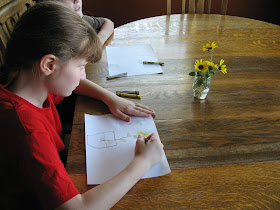
She picked a few, and we pulled out the crayons that we thought might match the color of the petals. As we held the crayons up to the flower, we were surprised to find the petals were not nearly as orange, or even gold, as we had thought at first glance. Plain old yellow ended up being the closest match.
Then, we went on to match the crayons to the color of the stem, and center of the flower too.
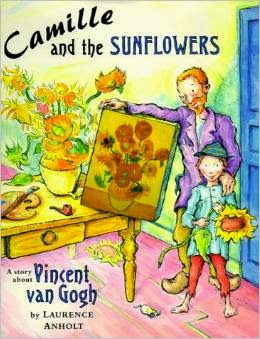
And, of course, the sight of the girls drawing sunflowers in living color, brought to mind a picture book to share with them (click here to hear it being read on Vimoe)...
...and a math related video (even if I couldn't convince the girls to try counting the flowers' spirals)...
...and a page from the Montana field guide to check to make sure...
...our flowers were even sunflowers at all.
Just in case you're keeping track, that's art, history, literature, math (barely, but still), and science - not too bad for a wildflower growing as a weed in the autumn soil.
It's great to be a homeschooler.
Wednesday, September 24, 2014
Fall Crayon Transfers
We gave a fall twist to the crayon "copy paper" concept, by coloring the back of fall-themed coloring sheets with stripes of red, orange, yellow, and brown crayon colors...
...then turning the sheet over, so the colored side was on top of a blank sheet of paper, and the coloring sheet design was facing up, ready to be traced with a pencil...
...then removed, to reveal...
...the colorful copy on the blank page underneath.
The sheets can be used more than once. My girls traced their pictures, and then wrote words, and drew free form pictures over the coloring sheet design, on fresh sheets of paper, until the colors wore out.
Tuesday, September 23, 2014
First Day of Fall - Owl Cookies
It's the first day of fall. At our house, that means it's time to make the owl cookies (click here for the recipe and instructions).
Conveniently, they baked up just in time to be enjoyed with the last chapter of Farley Mowat's Owls in the Family.
It's a fun, easy reader about the adventures of boy and his friends, and two owls they rescue on the prairies of Saskatchewan, one summer. It reminded me of a Canadian Henry and Ribsy type story. Though I have to admit, that these owl cookies usually bring to my mind another one of Beverly Cleary's classics.
“Susan, your owl is looking at something. What do you think he’s looking at?”
“Um-m.” Susan was taken by surprise.
“Um-m. Another owl?”
How dumb, thought Ramona. He’s looking at a bat, a mouse, a witch riding on a broomstick, Superman, anything but another owl. (excerpt from Ramona the Brave, chapter 5, "Owl Trouble")
Sunday, September 21, 2014
Pumpkin Cinnamon Roll Owls
For a fun fall treat mix up a batch of pumpkin cinnamon roll dough (click here for the recipe), pinching it in half and in half again, until you have 12 equal balls of dough.
Working on a floured surface, pat each ball down into a flat disk about 5'' in diameter.
Spread each disk of dough with softened butter...
...followed by a generous sprinkle of brown sugar, and cinnamon.
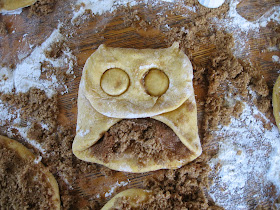
Fold according to the 4 Crazy Kings' clay owl instructions. First folding in the sides, pinching the dough firmly...
...and then folding down the top, to form a head.
Pinch the top corners of the head, to form "horn" feathers, and use a round cutter (or the collar that holds the nozzles on a frosting bag) to press in circles for eyes. Press down hard, to make nice deep circles, that won't bake out, and will help hold the dough down.
Use a butter knife to cut in slits for a beak.
Press in craisin, raisin, nut, or chocolate chip pupils.
Transfer the owls to a greased cookie sheet, and bake for 25 minutes at 350°F.
Serve warm if desired, but be careful of the melted butter and sugar under the head...
...it will pool up, and remain quite hot, even after the rest of the roll begins to cool.


