Tuesday, December 15, 2009
Kid Crafted Christmas Cards
My Favorite Ornaments, and Day Two Of The Holly Bloggy Christmas Bash
Monday, December 14, 2009
Homemade Red Licorice Recipe - Take 3, 4 and 5
Despite a definite change of gears into holiday mode around the house, our quest for a homemade red licorice recipe has continued. I haven't bothered sharing every trial, because quite frankly, they were more error than trial. Like, for instance, switching the flour from our first try, to wheat flour (not good). Or, attempting to order the amounts of the ingredients according to how they are listed on the back of the package of store bought licorice (this led us to put in way too much salt).
But, tonight, we hit on something kind of tasty. It's not licorice, but it's a yummy enough candy, that I thought I'd share.
Cherry Chews (we thought this was a better name, than Red Licorice - Take 5)
- 1 3/4 cups light corn syrup
- 1/2 cup flour
- 1/4 cup sugar
- 1/4 cup vegetable oil
- 1/2 teaspoon corn starch
- 1/4 teaspoon salt
- 1 1/2 packets of sugar free cherry flavored gelatin
In a small mixing bowl, mix the flour, salt, corn starch, and oil together until smooth.
In a medium sauce pan heat the corn syrup, and sugar to the soft ball stage, on a candy thermometer, stirring constantly.
Remove the pan from the heat, and pour in the gelatin. Stir until dissolved. And, then stir in the flour mixture.
As soon as the mixture cools enough to handle, spoon out tablespoon sized globs, and roll into ropes. The mixture might be sticky at first, and so you might want to roll it in powdered sugar, to make it easier to handle. It will become less sticky as it cools, but it will also become harder.
After the candy ropes have cooled, you can break them apart into bit sized pieces.
This candy has a nice fruity taste, a little like a Jolly Rancher, but a texture closer to a slightly stale Laughy Taffy. My kids love it.
With only 10 days to go until Christmas, we'll have to postpone any additional trials, until after the holiday. After all, I'm going to need some corn syrup left, for making peanut brittle.
It's great to be a homeschooler.
Homemade Gifts and A Holly Bloggy Christmas Bash
- Matchbox Doll Houses
- Tiny Sock Dolls
- Stuffed Felt Cars With Rolling Milk Cap Wheels
- Recycled Pull-Toy Dogs
- Tiny Knit Dogs and Cats
- Cardboard Submarines (what child doesn't want to play with a box?)
- Homemade Lip Balm
- Cold Porcelain Clay Pendants
- Chinese Yo-Yo Stocking Stuffers


And, it's great to be a homeschooler!
Sunday, December 13, 2009
Puffy The Snowman - Marshmallow Snowmen Monsters for Science Sunday
Of course, since we are homeschoolers, and this is Sunday, and there's a Science Sunday link up going on over at Adventures in Mommydom (at least there should be, sometime later today), it was also inevitable, that we wouldn't stop there. (If you're looking for instructions for making marshmallow snowmen, check out The Decorated Cookie, hers are adorable.)
Armed with a printout from the Exploratorium, with the heading of, "The Accidental Scientist, Science of Cooking", we popped our marshmallow creations into the microwave for 30 seconds, and watched while they expanded to four times their original size. It's actually really cool. There was a lot of oohing, aawing, and happy exclaiming (and, the kids got excited too!).
Then, after we removed them, we watched as they deflated, and hardened into shape. To find out what's happening on a molecular level, click the Exploratorium link above.
We discovered that right out the microwave the the marshmallows were all warm, gooey, sugary goodness. But, once they cooled, they turned into hard, crunchy, sugary goodness.
And, before too much sugar could be consumed, we moved on to a discovery of the nature of sugar crystals, and how easily they dissolve in water, as we rinsed them off of the dishes, the microwave, the table, the counter tops, and the floor.
It's great to be a homeschooler.
Saturday, December 12, 2009
Melted Snowman Snacks
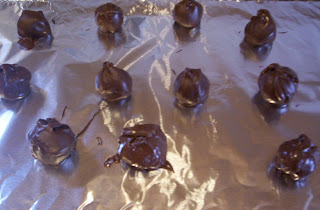
Super Easy, Kid Friendly, Chocolate Fudge Truffles
- one 12 oz package of chocolate chips
- one 14 oz can of sweetened condensed milk
- one teaspoon vanilla
Combine the chocolate chips, and the condensed milk in a microwave safe bowl. Microwave, until melted - about 1 minute 30 seconds, stirring at 30 second intervals. Add the vanilla to the melted chocolate, and pour the combination into a greased, 9x9 inch cake pan. Refrigerate until set. Cut into squares.
Once you have the fudge made, roll the squares into balls (this is a little bit messy). Place the fudge balls back into the fridge to harden for a few more minutes.
Melt a cup, or so of chocolate chips in the microwave, as you did for the fudge, but without the milk. You might end up needing more chocolate, depending on the number of truffles you want to make, but work in small batches, to keep the chocolate from setting before you're done.
Remove the fudge balls from the refrigerator, and drop them, one at a time, into the melted chocolate. Remove them from the chocolate with a spoon, or fork, allowing the excess chocolate to drip back into the bowl. Place the truffles onto a tinfoil covered plate, or cookie sheet.
Finally, put the truffles back into the refrigerator for another few minutes, to set again.
Enjoy!
It's great to be a homeschooler.