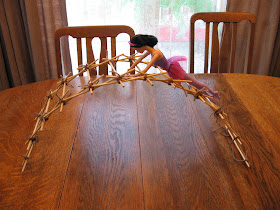
Building a model of a Da Vinci inspired bridge out of supplies found from around the house, might sound like a project for the school year, but I'm including it in our summer fun series, because the Da Vinci designs are so simple, building them is more like doing a jigsaw puzzle, than working out an engineering problem. And, on a too-hot-and-stormy-to-go-outside kind of day, who doesn't like a good puzzle?
Most, if not all, of the Da Vinci bridge models you can buy come with notched planks - one notch right in the middle, and two an equal distance from either end, on the opposite side from the middle notch.
We started out using chopsticks without notches (the step by step building instructions we followed can be found in the resource list at the bottom of the page). Actually, we started out using sugar cookie sticks...
...but they snapped under the pressure holding the bridge together, so we moved on to chopsticks. They worked perfectly for small, simple bridges...
...but tended to roll, and come apart as additional levels of planks were added.
Notching the chopsticks seemed difficult, so we opted to cut notches in drinking straws...
...to use in combination with the sticks. This worked really well...
...making the building process so much easier, except that as more sticks, and straws were added, the pressure proved to be too much for the straws as well...
...and they started to bend in the same spots where our cookie sticks had broken. If nothing else, the cookies, and straws served to highlight how the design uses gravity and friction to direct the pressure down, to hold the pieces in place.
Finally we read, that while most of the models come with notched planks, the original sketches actually called for the planks to be lashed together with rope. I'm not sure if that is correct, because none of our other sources agreed with it, but we tried it anyway...
...tying the chopsticks in place, with short lengths of yarn.
Not only were we able to build the bridge longer, and higher...
...but it was sturdier - if still a little springy.
In fact, successfully testing our bridge with one book, we built on until we had a complete half circle, at which point friction, and gravity started working against, instead of for us.
The taller bridge easily held two semi-heavy, hard back books. We tried a third book, but the springy bridge sprang back with enough force to knock the books off, and flip the bridge across the room - one of Newton's laws at work, I'm sure.
I can't imagine, that soldiers being flung bridge and all, into a river, would be very happy. That of course, brought up the question of how you were suppose to get across the bridge, anyway. My thinking is that Leonardo intended for cross planks to be added to the frame once it was in place, to allow soldiers to march right across. But then, Barbie might have the right idea, and it might have been intended to work as a sort of arched ladder, more than a bridge.
At any rate, the one thing we did learn, was that in this case, as an architectural engineer, Leonardo Da Vinci was an excellent - artist.
Resources we found helpful:
Katerina Lipertova's Practical Science Activity created by TES Science - includes a video clip of students building various sized Da Vinci bridges, up to some large enough to stand on.
Instructions for Building Leonardo Da Vinci's Self-Supporting Bridge.
Leonardo Da Vinci Inventions from Pathfinder's Education Support - talks about the bridge being lashed together in Da Vinci's original design.
Log Bridges and More - a picture of a similar design, built life-sized, out of logs.
Leonardo's Freestanding Bridge from MJ2 Artisanos - for the idea of the straws.


.JPG)


Hmmmm..... I have some of those notched popsicle sticks, I wonder if those would work.
ReplyDeleteI was hoping I would see more of this project when I saw the one picture on your compilation post. This is absolutely wonderful.
ReplyDeleteWe're planning a similar activity, although I'm certain I wouldn't have thought about doing it with biscuits! Brilliant!
ReplyDeleteThis is great!
ReplyDelete