Tuesday, November 30, 2010

Cinnamon Nuts


We sampled some warm, cinnamon almonds, from a local candy store, at a community Christmas tree lighting event, this weekend. I don't know if it was the snowy, mountain air, or the festive atmosphere of blocked off streets, for late night shopping, with warming barrels at every corner, and Dickens' carolers mingling about, or just that the crunchy, candy coated nuts were truly magical. But, I instantly had a new holiday favorite, and I had to know how to make some myself.

At home, the next morning I Googled cinnamon nuts, and came up with several different recipes, that all sounded promising.

If you're a regular reader, you know my normal way of dealing with this kind of a fork in the road, is to follow each path, one by one, until I hit on the one I'm looking for.

But, almonds are not exactly inexpensive treats, and I have a limited nut allotment in my holiday budget. So, figuring in the pecans, I had left over from Thanksgiving, and the peanut brittle, I'd still like to make, I settled on two recipes to try, and hoped for the best.

For the first, and fastest of the two, I used my leftover pecans. I halved the recipe from epicurean.com, and used:
  • 1/8 cup evaporated milk
  • 1/2 cup granulated sugar
  • 1/8 teaspoon cinnamon
  • 1 tablespoon butter
  • 1/8 teaspoon salt
  • 1 and 1/2 cups pecans.

Following the recipe directions, I mixed all the ingredients together in a sauce pan, over medium heat, and stirred, until the sugar was dissolved, and the butter melted. Then, I added the nuts, and continued to stir, until all the syrup was gone from the pan. With such a small amount, it didn't take long at all - only a minute, or so.

Then, I spread them out on wax paper, and let them cool.

They were delicious, but not at all like the candies from the Christmas tree lighting. Instead of candy coated, they were more, or less cinnamon glazed. Kind of like a pecan pie, without the pie. Still very good, and not as sticky, as you might expect, but not quite what I was after.

So, undaunted, I proceeded with the second recipe. This time I used almonds, and a recipe from allrecipes.com, though I modified it according to some of the suggestions in the comments there, ending up with:


  • 1 egg white
  • 1 teaspoon vanilla
  • 3 cups of whole, unsalted, almonds
  • 1/4 cup granulated sugar
  • 1/4 cup brown sugar
  • 1/4 teaspoon salt
  • and 1 teaspoon cinnamon.

Again, following the recipe directions, I beat the egg white until frothy, but not stiff...


...stirred in the vanilla, then the nuts, and the rest of the ingredients, tossing them with a spoon, to coat the nuts.

Then, I spread them out in a single layer in a greased, cake pan, and placed them in a 250 degree Fahrenheit oven, for 1 and 1/2 hours, stirring them every 15 minutes.


It was certainly more time consuming, but the smell was wonderful, to say the least, and I was rewarded with a near success. This recipe is good, very good even, bordering on addictive actually, but not quite the magical, "Turkish delight" sort of wonderful, I'm looking for.

I'm sensing the birth of a new holiday quest. Next year the nut budget will have to be enlarged. I might have to think about taking a summer job...I wonder if the candy store will be hiring?

It's great to be a homeschooler.

Our Nativity Scene


Some years ago, at a MOPS (Mothers of Preschoolers) meeting, when my oldest were babies, our pastor's wife gave a talk, on Christmas decorating with toddlers in the house. One thing she emphatically suggested was having at least one, hands on, nativity scene, for little ones to play with, as they worked through the story of Christmas.

I ran straight out, and picked up the Little People Nativity set, and it has been a fixture in our house, every Christmas season, since then.

The children, especially my youngest, always enjoy seeing it, and playing with it. But, I, in my typical type A personality fashion, worry.

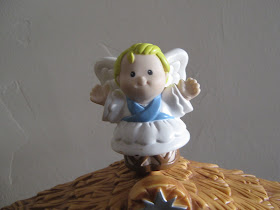
I worry about the biblical inaccuracy of a winged, girlish looking, angel...


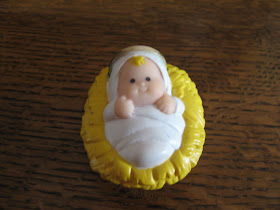
...and a blonde Jesus...


...and, that too often the wise men become princesses, or evil terrorists, holding Mary hostage, in the children's games.


Today, though, what caught my eye, was an extra member of the cast. He seemed somehow out of place.

"Who put this guy here?" I asked.

The children blinked, and although no one admitted to adding him, one of the older children explained, "That's modern man, coming to the knowledge of Christ."

Pretty cool!

I guess, maybe, I was over thinking things.

I'll be linking this post to Wonder Mom's Bible Alive! Tuesday, over at The Fantastic Five, where you can find more Bible lessons, and activities for children.

It's great to be a homeschooler.

Monday, November 29, 2010

A Christmas Windowsill Garden


The beginning of December, or end of November, might seem like an odd time to start planting seeds. But, we discovered the seeds at our local garden shop were on sale, and several of them reminded us of Christmas.

So, for a Math Monday activity, we planted a Christmas, windowsill, garden, with snow peas, mint, a basil trio, that has cinnamon, lemon, and rose scented basil, a money plant, that reminded us of the chocolate Chanukah, and Christmas coins, and some snowflake candy tuft.

You might be wondering what this has to do with math. Quite a bit, actually. We compared the seeds: small...


...smaller...


...smallest.


We measured for planting depth...


...and spacing.


And, we used the calendar, to count out, and mark the germination periods, so we'll know when to watch for the seedlings to appear.


Or, we might just stand, and wait for them, I'm not sure. Either way, I think I'll take my mother's advice, and pin a ribbon across the window sill, to hold the planter box in place. It would be quite a pity to have such a successfully sneaky math lesson end up in a pile on the kitchen floor.

I'll be sure to let you know how it turns out, but in the meantime, you can find more fun with math, at this week's Math Monday link-up, hosted by Joyful Learner.

It's great to be a homeschooler.

Jingle Craft Foam Christmas Bracelets


We had some fun decking the halls, or at least our wrists, today, with a simple idea from First Palette.

They have a great step-by-step, but basically, you just cut a strip of craft foam long enough to go around the wrist in question.

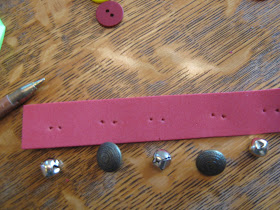
Then, choose buttons, or bells, or bobbles to sew on.


Use a pen to poke holes through the craft foam, where you will sew the buttons.


If the holes on your buttons, or bells will allow, you can let children sew the buttons, and bells on with a piece of ribbon, and a darning (not sharp) needle.


Or, if the holes are small, and you have to use a regular, sharp, needle, you poke it through for the child, and let them pull it tight (C, age 4, really enjoyed this process).


Or, have an older sister do the sewing. A (age 9), and G (age 11) have made several Christmas bracelets, for themselves, and their pets (then they are collars), already this morning.


Help the children tie a knot in one end of the string, or ribbon, and a loop at the other end of the bracelet...


...to hook over the button, or bell, on the other side, as a fastener.


It's great to be a homeschooler.

Sunday, November 28, 2010

Christmas Science for Kids - Identifying the Tree

We brought our Christmas tree into the house, after church today, but will have to wait for all of the snow, and ice to melt off, before we can begin decorating. So, it seemed like a good time to put on our detective caps, and practice our tree identification skills, for Sunday Science.

We identified our Christmas tree last year, too. Just for curiosities sake, even though I was pretty sure they were similar trees, we decided not to look back at lasts years post, until we had walked through the Arbor Day Foundation's Tree Identification Guide, with this tree.

The first question asks if it's a conifer, or not, and if it has scaly, or needle like leaves. Our tree is a cone bearer, and has needle like leaves.


Next, we had to choose between trees that were deciduous, or evergreen, with single needles, or clusters of needles. Our tree is evergreen (not like the larch, below, that we snapped a quick shot of in early October), with single needles.


Then, we hit a question about the needles, and whether they were four sided, and easy to roll between our fingers, or flat. The needles on our tree are four sided, and roll easily between our fingers.

Finally, there was a series of questions about the cones, which we could not answer. Our tree does not have any mature cones. In fact, it's possible, the little cones on it, are not cones at all, but galls, left behind (at least I hope they're left behind, I have to do some more research into that) by some sort of woolly aphid (like the fairy bugs we saw around our Box Elder, earlier in the fall).

If they are galls, that could be a clue as to the type of tree it is. From as far as we could go with the Arbor Day guide, we know we have a spruce. It actually looks a lot like a Blue Spruce, or and Engelmann Spruce. The two trees look a lot alike. But, Engelmann Spruces are susceptible to the aphids.

In fact, after peeking back at last years post, we were beginning to suspect it is an Engelmann Spruce. But, then we read, here, that if you find a tree that looks a lot like an Engelmann, but has sharp enough needles to make it painful to grab, it could be a Blue Spruce/Engelmann hybrid. Judging from the scraps, and scratches the Man of the House received when bringing it in - I'd say we could have a hybrid on our hands.

Now that it's dry, we'll be spending our evening decorating it, with great care. On the upside, a sharp needled tree will probably reduce the chance of the children wanting to play with the ornaments, once they're hung.

For more fun with science, check out this week's Sunday Science link-up, at Adventures in Mommydom.

It's great to be a homeschooler.

Perfecting the Window Clings - An Update Post

After I posted about our glittery, snowflake, window "clings" yesterday, Christy from Superheros and Princesses, left a comment, that she'd seen something similar on Family Fun. Naturally, I clicked straight over there, to check it out.


They are making their glittery snowflake clings with puffy paint, which I found interesting. But, what really caught my eye, was the discussion going on in the comments, about the best way to make them.

It seems, clings made with puffy paint, on wax paper, don't cling well. The suggestion from the peanut gallery was to make them on a glass plate, or heavy sandwich bag.


I was curious if this would work for clings made with glue, too. So, I gave it a try, and just for comparison, made a snowflake out of puffy paint, too.


It was hard to tell with the puffy paint, if the paint was completely dry. Once it was dry though, the paint snowflake peeled easily off the plate, and clung to the window, just like the commercial clings. But, it was very delicate, and easy to tear it apart, when handling it. And actually, the snowflake pictured below was stuck on in several pieces.


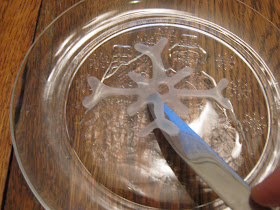
It was easier to tell when the glue was dry, because it became transparent. But, it was harder to peel it off of the plate. I had to use a butter knife, to ease it up. With wax paper, the glue peels right off.


But, once it was successfully removed from the plate, it was sturdy, and it did stick to the window, without needing to be wet. Which, I thought was wonderful, because then there were no drips to clean up. I even removed it from the window, and stuck it back up a few times, just to see if it would work.


A few hours later though, as the temperature outside dropped, the glue cling fell from the window, and I had to wet it down, to get it to go back up.


The paint cling, and the glittery, glue clings, that I had stuck on earlier, have all stayed securely in place.


So, I'd have to say the paint clings are easier to put up, but we still prefer the delicate, icy, transparency of the glue, especially the ones with the glitter.


It's great to be a homeschooler.

Saturday, November 27, 2010

Crayon Melt Christmas Tree Craft


The boys headed of to the woods, with the Man of the House, this afternoon, in search of a Christmas tree. The minivan can't make it safely up the logging roads, and there is only room for two children to ride along, in our truck, so they have to take turns going on the quest for the tree.

The older girls, who got to go last year, consoled themselves by walking to the library. But, the younger girls, who haven't had a turn yet, were despondent, until they realized they would get to make their own, Christmas tree craft, while the boys were gone.

To begin with, I folded a piece of green construction paper in half for each of the girls, and drew a triangle on it, for them to cut, so they had two, matching triangles.

Then, they used a hole punch, to make holes through both triangles at once. I had to help C (age 4) with the puncher, but E (age 6) was able to manage it on her own.


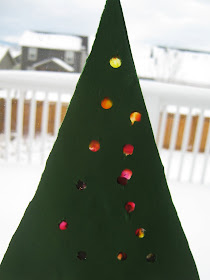
When they had their trees covered in holes, I laid out a piece of wax paper on top of an old towel, with one of the triangles underneath, as a guide, for them to drop crayon sharpenings onto. They used mainly red, silver, and yellow crayons. Though, C added in some purple, and E used some pink.


I covered the crayon bits with another sheet of wax paper...


...folded the towel over it, and ironed across it, with a hot iron...


...to melt the crayon, between the sheets of wax paper. This is probably a very familiar technique to anyone working with children's crafts, and is just like what we did for our fall trees.


I let the crayon cool for a few seconds, and then traced the triangle onto the wax paper, for the girls to cut out, inside the lines - making it a little smaller than their paper triangles.


Then, they glued it between the triangles, making sure to line up the holes, on each side, and sandwiching in a small brown rectangle, at the bottom, for a trunk.


When, we hung them on the windows, the sun shone through the holes, to make the "ornaments" glow, in a very satisfying manner.


It's great to be a homeschooler.